


Guided Tour -
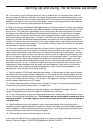
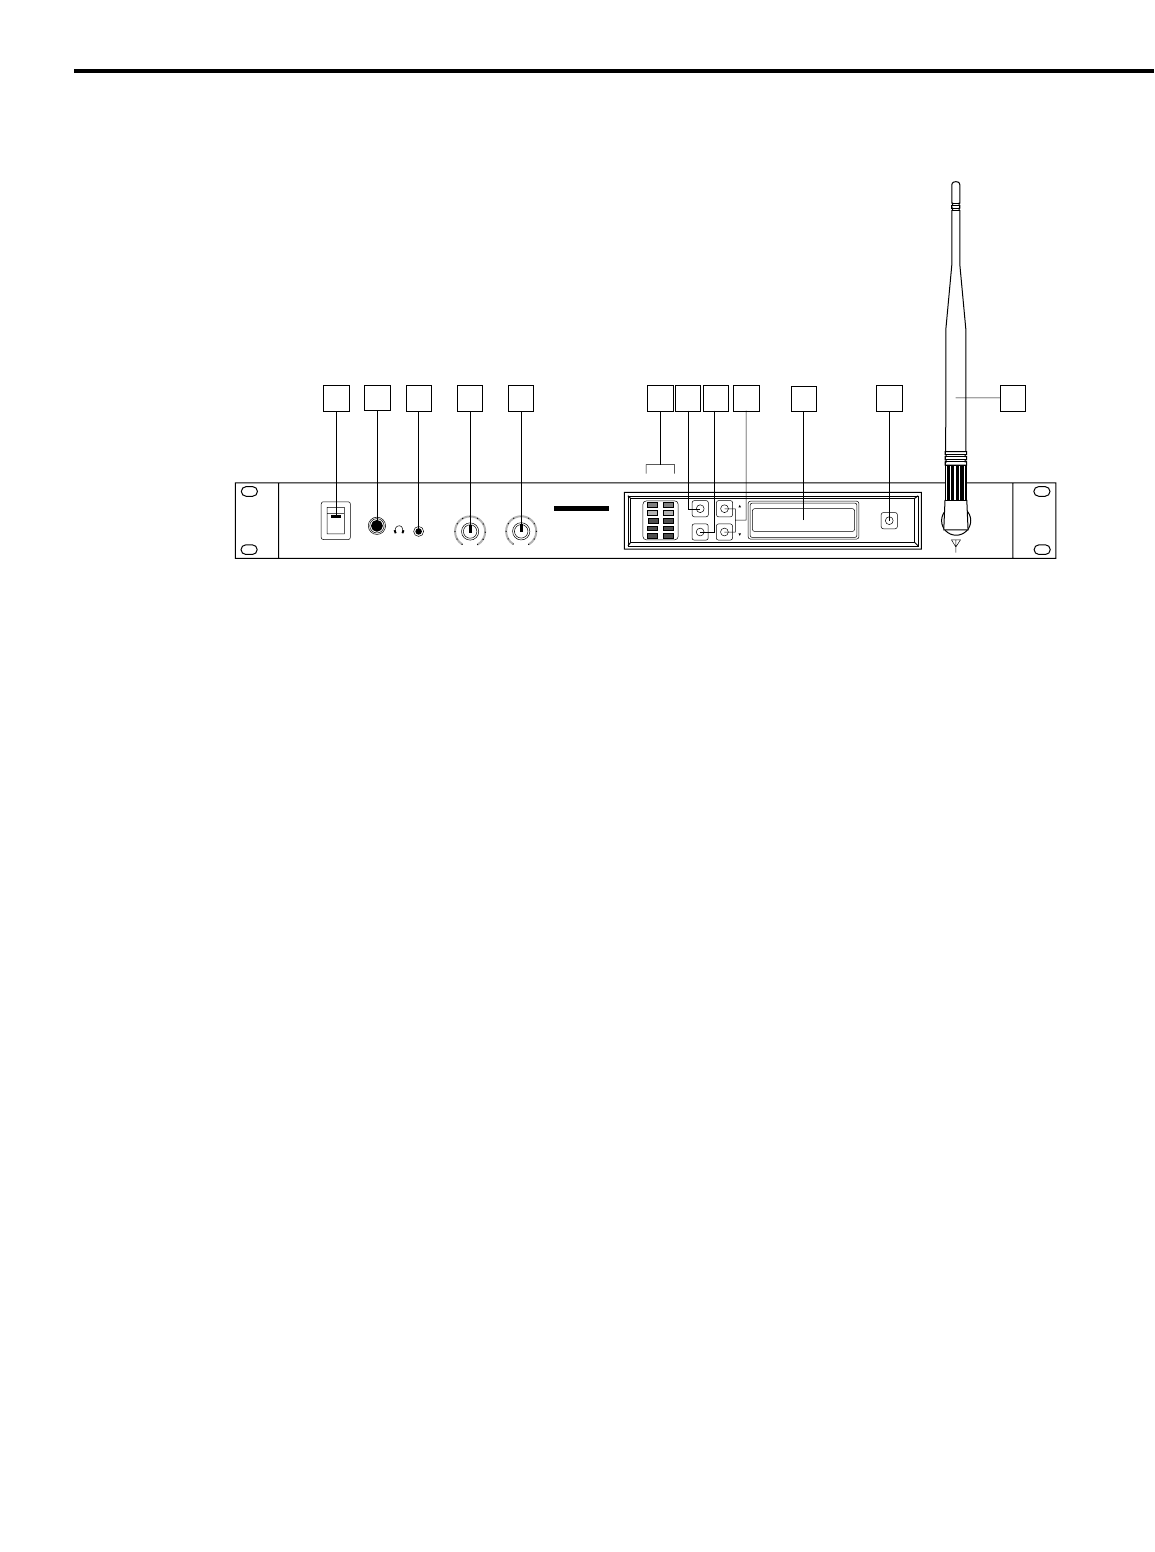
Wireless EarAmp® Transmitter Front Panel
4
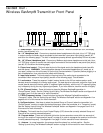
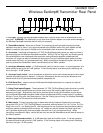
1: Power switch - Use this to turn the main power on and off. When the transmitter is on, the display
section (see #9 below) is lit.
2a: 1/4" Headphone jack - Connect any standard stereo headphones to this jack (via a 1/4" TRS plug)
in order to monitor the audio signal connected to the transmitter’s rear panel input jack(s) (see #3, #7,
and #8 on the following page). The built-in headphone preamp delivers approximately 200 mw of power.
2b: 1/8" (35 mm) Headphone jack - Connect any Walkman-style stereo headphones to this jack (via a
1/4" TRS plug) in order to monitor the audio signal connected to the transmitter’s rear panel input jack(s)
(see #3, #7, and #8 on the following page).
3: Phone Level control - This knob sets the level of the signal sent to the headphone jacks (see #2a
and #2b above). WARNING: To avoid possible damage to connected headphones (or, worse yet, to
your ears!), always turn this all the way off (to the fully counterclockwise “0” position) before plugging in a
pair of headphones—then raise the level slowly while listening.
4: Input Level control - This knob sets the incoming level of the audio signal connected to the
transmitter’s Main rear panel input jack(s) (see #3 on the following page). See #5 below.
5: Level meters - These five-segment “ladder” meters (similar to the VU bar meters used on audio
devices) show the strength of incoming audio signal. For best signal-to-noise ratio, adjust the Input Level
control (see #4 above) so that the yellow “0” segment lights frequently, with the red “+6” segment lighting
only infrequently during the very highest signal peaks. If you hear distortion, back the control off slightly.
6: CH. (Channel) button - Press this button to place the Wireless EarAmp® transmitter in
“Group/Channel” mode. See the “Setting Up and Using The Wireless EarAmp®” section and Appendix A
on pages 8 and 10 of this manual for more information.
7: FREQ (Frequency) button - Press this button to place the Wireless EarAmp® transmitter in
“Frequency” mode. See the “Setting Up and Using The Wireless EarAmp®” section and Appendix A on
pages 8 and 10 of this manual for more information.
8: Up/Down buttons - Use these to select the desired Group or Channel (when the transmitter is in
“Group/Channel” mode) or to select the desired frequency (when the transmitter is in “Frequency” mode).
See the “Setting Up and Using The Wireless EarAmp®” section and Appendix A on pages 8 and 10 of
this manual for more information.
9: Display - This backlit two-line Liquid Crystal Display (LCD) shows the currently selected Group and
Channel or the currently selected frequency.
10: Program button - Press and hold down this button for two seconds or more within ten seconds of
turning on the receiver Program switch (see #7 on page 6) in order to reprogram the receiver to utilize the
currently selected frequency. See Appendix A on page 10 of this manual for more information.
11. Antenna - In normal operation, the antenna should be placed in a vertical position. See the
“Setting Up and Using The Wireless EarAmp®” section on page 8 of this manual for more information.
ANTENNA
0
SAMSON
POWER RT80 UHF SYNTHESIZED
PHONES PHONES LEVEL INPUT LEVEL
EarAmp
®
STEREO TRANSMITTER
LEFT
RIGHT
+6
0
-6
-12
-18
CH.
GROUP
FREQ
UP
DOWN
PROGRAM
2
4
-2
-4
-6
6
-8 8
-10
10
2
4
-2
-4
-6
6
-8 8
-10
10
0
1
2a
2b 3 4 5 6 87
9
10 11