


QuickStart
If you’ve had some prior experience using wireless systems, these QuickStart instructions will get you up
and running with your Wireless EarAmp® system in a matter of minutes! Detailed instructions for setting
up and using your Wireless EarAmp® can be found on pages 8 -11 of this manual, and the “Guided Tour”
sections on pages 4 - 7 provide full descriptions of all transmitter and receiver controls and displays.
1. Physically place the transmitter where it will be used, install its antenna, and extend it vertically.
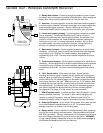
2. Place a fresh battery in the receiver and turn it on momentarily to check it; the receiver’s Battery LED
will light red if the battery is weak and needs to be replaced.
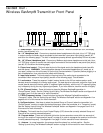
3. Turn off all audio equipment in your system and connect your mixer’s line, aux or cue outputs to the
transmitter’s Main inputs. If you want to transmit additional signal, use the Aux and/or Daisy Chain
inputs.
4. Connect the supplied AC adapter (don’t use substitutes!) to the DC Input on the rear panel of the
transmitter (first looping the cable around the strain relief), then plug it into a 3-pin grounded AC socket.
5. Set the Phones Level and Input Level controls on the transmitter to minimum (to the “-10” position)
and then turn the transmitter on by pressing its Power switch; the front-panel LCD will light up.
6. Turn on the power to the receiver, place both of its antennas in an upright position, and set the
Volume knob to minimum (fully counterclockwise). Do not place the earbuds in your ears yet.
7. Set the transmitter to either Group/Channel mode (by pressing the CH. button) or Frequency mode
(by pressing the FREQ button). Group/Channel mode must be used whenever there are two or more
transmitters being used in the same location.
7a. If in Group/Channel mode, use the Up/Down buttons to select a Channel. Press both the CH. and
FREQ buttons simultaneously to enable Group selection (again, using the Up/Down buttons).
7b. If in Frequency mode, use the Up/Down buttons to select a frequency between 614.35 and 662.0
MHz, in 25 kHz increments.
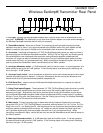
8. To set the receiver to the same radio frequency, turn its Program switch off, then on (towards the “up”
arrow) and then, within ten seconds, press and hold the transmitter’s Program button for at least three
seconds. When correctly programmed, the receiver’s TX LED will flash.
9. Do a walkaround through the intended area of coverage while observing the receiver’s TX LED as you
do so (it will light steadily green when receiving valid tone pilot signal). Reposition antennas or select a
different Group/Channel or frequency as necessary.
10. Turn on your mixer and set the level of the signal you’re sending to the transmitter to unity gain
(0 vu). Then slowly raise the transmitter’s Input Level control while observing the level meters; the “0”
segment should light frequently, the “+6” segment only infrequently. If you have signal connected to the
Aux inputs, use a screwdriver to adjust the rear-panel Aux Input control. If you are sending very hot
signal to the transmitter, you may need to set either the Main and/or Aux Attenuator switch to “-15 dB.”
The audio signal can be monitored by connecting a pair of headphones to the transmitter and slowly
raising the Headphone Level control or by connecting the Daisy-Chain outputs to an external monitoring
system.
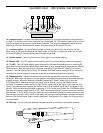
11. Set the receiver’s 2 CH/Stereo mode switch as desired (see Appendix C for details). Connect the
supplied earbuds (or third-party earpiece) to the receiver’s headphone jack and place them in your ears.
Slowly turn up the receiver’s volume control until you achieve the desired level. The EarAmp® receiver
should always be used at as low a volume as possible. If you hear ringing in your ears, turn
down the volume control and operate it at a lower level!
12. Adjust the receiver’s Balance control and Limiter Level, Bass and Treble trimpots as desired. If
you’re operating at low signal levels, turning the loudness control on will help improve legibility. Close the
battery door and clip the receiver to your belt.
3