


Setting Up and Using The Wireless EarAmp®
8
Setting up your Wireless EarAmp® is a simple procedure which takes only a few minutes:
1. Remove all packing materials (save them in case of need for future service) and locate the
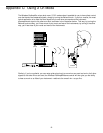
Wireless EarAmp® transmitter so that there is an unobstructed line of sight between it and the receiver(s)
in your system (any number of receivers—all receiving the same signal—can be used with a single
transmitter. Be sure, however, that the receivers never come within 10 feet of the tranmitter antenna).
For convenience, the EarAmp® transmitter is rack-mountable, requiring just a single space. Mount the
supplied antenna to the transmitter by inserting the BNC connector and twisting clockwise until snug.
The antenna mounting is adjustable; however, it is best to begin with it in an upright position.
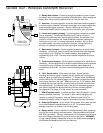
2. Press gently up on the EarAmp® receiver’s battery door release (see #1 on page 6) and swing the
door open in order to access the battery compartment. Note that the door is hinged and is not intended
to be removed from the case. Insert a 9-volt alkaline battery, being careful to observe the polarity
markings. Warning: Reversing the battery polarity may cause permanent damage to your
EarAmp® receiver.
3. Turn the receiver power switch “On” (see #8 on page 6). The Battery LED (see #13 on page 7) will
light red if the battery is weak and needs to be replaced. Once you’ve verified battery strength, turn the
power switch “Off” again.
4. Close the receiver battery door by swinging it gently upwards until you hear the door release click.
5. Turn off all audio equipment (mixers, amplifiers, etc.) in your system and make the physical cable
connections between your mixer (typically aux sends, cue sends or line outputs) and the Main inputs of
your Wireless EarAmp® transmitter. WARNING: Be sure to connect only line-level inputs to the
EarAmp® transmitter; connecting amplifier outputs or other powered (“speaker”) outputs can
cause severe damage and will void your warranty. If you want to transmit additional signal, use the
Aux inputs and/or the Daisy Chain inputs. Note that the Daisy Chain inputs can also serve as outputs,
routing the signal connected to the Main inputs at unity gain. We recommend the use of balanced three-
conductor cabling wherever possible (unbalanced two-conductor 1/4" plugs can also be inserted into
these inputs, but you’ll get better signal quality and less outside noise and hum if you use balanced
lines). When connecting stereo signals, set the rear panel Stereo/Mono switch to the “Stereo” position.
When connecting monophonic signal(s), use the left jack(s) only and set the rear panel Stereo/Mono
switch to the “Mono” position.
6. Connect the supplied power adapter to the transmitter’s rear panel DC connector (first looping the
cable around the strain relief, as silk-screened on the rear panel) and plug the other end into any 3-pin
grounded AC socket. WARNING: The substitution of any other kind of power adapter can cause
severe damage to the Wireless EarAmp® transmitter and will void your warranty.
7. Turn the Phones Level and Input Level controls on the EarAmp® transmitter completely
counterclockwise (to the “-10” position) and depress the front panel power switch to turn the unit on.
The display section will light up.
8. Next, select the radio frequency you wish to use for your transmitter and receiver(s). Turn on the
power to your Wireless EarAmp® receiver, place both antennas in an upright position, and set the
Volume knob to minimum (fully counterclockwise). Do not place the earbuds in your ears yet.
8a. If only a single EarAmp® system is being used, the transmitter can be placed in “Frequency” mode
by pressing the front-panel Frequency button; the Up/Down buttons can then be used to directly enter the
desired radio frequency. However, if two or more transmitters and receivers are being used at the same
location, the Wireless EarAmp® transmitter must be set to Group/Channel mode, by pressing the front-
panel Channel button. In a multi-transmitter setup, all devices must be set to the same Group (though
each transmitter/receiver pair must use its own Channel) or intermodulation noise may occur. Press both
the Channel and Frequency buttons simultaneously; the word “Group” will begin flashing. The Up/Down
buttons can now be used to select the desired Group. Once you’ve selected the Group you want, press
the Channel button again and use the Up/Down buttons to select a Channel within that Group (see
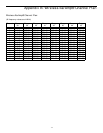
Appendix B on page 11 in this manual for a complete channel plan).