


12
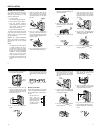
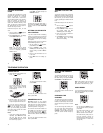
9. Press and lift out the handset hold-
er, flip it over as shown, then snap it
back into place so it holds the hand-
set.
10. Lift the base’s antenna to a vertical
position.
CONNECTING AND
CHARGING THE BATTERY
PACK
The TAD-794 comes with a rechar
g
e-
able nickel-cadmium batter
y
pack in the
handset but not connected. Before usin
g
y
our phone,
y
ou must connect the bat-
ter
y
pack and then char
g
e it for about 14
hours.
1. Press down and slide off the batter
y
pack compartment cover.
2. Unfasten the plastic retainer strap
and lift the batter
y
pack out of the
compartment. Plu
g
the batter
y
pack’s connector into the socket in
the compartment. The connector fits
onl
y
one wa
y
.
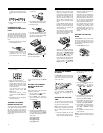
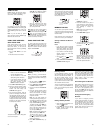
3. Put the batter
y
pack in the compart-
ment and fasten the retainer strap.
4. Replace the cover.
5. To char
g
e the batter
y
pack, simpl
y
place the handset on the base, fac-
in
g
either up or down. The CHARGE
indicator on the base li
g
hts.
Rechar
g
e the batter
y
pack when
RECHARGENOW
appears and flash-
es on the handset displa
y
.
13
Notes:
• When
y
ou first use the phone after
char
g
in
g
or rechar
g
in
g
the batter
y
pack, the phone mi
g
ht not work and
y
ou mi
g
ht hear a five-beep error si
g
-
nal when
y
ou press
TALK
. If this
happens, return the handset to the
base for about 5 seconds. This re-
sets the securit
y
access-protection
code.
• If the CHARGE indicator does not
li
g
ht when
y
ou place the handset on
the base, be sure the batter
y
pack
and AC adapter are correctl
y
and
securel
y
connected.
Also, check the char
g
in
g
contacts
on the handset and base. If the con-
tacts are dirt
y
or tarnished, clean
them with a pencil eraser.
• About once a month, full
y
dischar
g
e
the batter
y
b
y
keepin
g
the handset
off the base until
RECHARGE
NOW
appears and flashes on the dis-
pla
y
. Otherwise, the batter
y
pack
loses its abilit
y
to full
y
rechar
g
e.
• If the batter
y
pack becomes weak
durin
g
a call, the handset beeps ev-
er
y
four seconds, and
RECHARGE
NOW
appears and flashes on the
displa
y
. If this happens,
y
ou must re-
char
g
e the batter
y
pack before
y
ou
can make another call.
• If the batter
y
pack is completel
y
dis-
char
g
ed or the base loses power
while the handset is awa
y
from it,
place the handset on the base to re-
set the securit
y
access-protection
code. If it was the handset that lost
power, rechar
g
e the batter
y
pack.
• The supplied batter
y
pack should
last for about a
y
ear. When it loses
its abilit
y
to full
y
rechar
g
e, order a
replacement batter
y
pack from
y
our
local RadioShack store (see “Re-
placin
g
the Batter
y
Pack” on
Pa
g
e37).
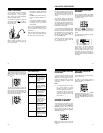
SETTING THE DIALING
MODE
Set
DIAL MODE
on the back of the base
for the t
y
pe of service
y
ou have. If
y
ou
are not sure which t
y
pe
y
ou have, after
y
ou char
g
e the handset batter
y
pack, do
this simple test.
1. Set
DIAL
MODE
to
T
(tone).
14
2. Press
TALK
on the handset and lis-
ten for a dial tone.
3. Press an
y
number other than
0
.
Note:
If
y
our phone s
y
stem requires
that
y
ou dial an access code (9, for
example) before
y
ou dial an outside
number, do not press the access
code number either.
If the dial tone stops,
y
ou have
touch-tone service. Leave
DIAL
MODE
set to
T
.
If the dial tone continues,
y
ou have
pulse service. Set
DIAL MODE
to
P
(pulse).
4. Press
TALK
or place the handset on
the base to han
g
up.
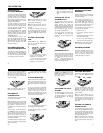
TURNING THE BASE’S
RINGER ON AND OFF
To turn off the base’s rin
g
er, set
RINGER
on the back of the base to
OFF
. You can
still make or receive calls usin
g
this
phone, and telephones on the same line
and the TAD’s handset (when it is awa
y
from the base) still rin
g
when there is an
incomin
g
call.
To turn on the base’s rin
g
er, set
RINGER
to
ON
.
SETTING THE HANDSET
RINGER’S TONE AND
VOLUME
Follow these steps to set the handset
rin
g
er’s tone and volume.
1. Lift the handset. If appears,
press
TALK
to turn it off.
2. Press
VOLUME
. The phone dis-
pla
y
s and sounds the current rin
g
er
tone and volume.
3. Repeatedl
y
press
VOLUME
until
y
ou
hear the desired rin
g
er tone and vol-
ume. Each time
y
ou press
VOLUME
,
the rin
g
er settin
g
chan
g
es in the fol-
lowin
g
order:
RingType AHigh
RingType ALow
RingType BHigh
RingType BLow
talk
15
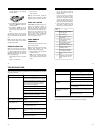
SETTING THE NUMBER
OF RINGS
Set
RING
TIME
on the side of the base to
3
,
5
, or
T/S
to select how lon
g
the TAD
waits before it answers a call (3 rin
g
s, 5
rin
g
s, or toll-saver).
Note:
If
y
ou plan to check
y
our messa
g
-
es b
y
lon
g
distance, set
RING
TIME
to
toll-saver (see “Usin
g
Toll-Saver” on
Pa
g
e32).
SETTING THE DAY AND
TIME
You must set the da
y
of the week and
time so the TAD can record the correct
da
y
and time of each messa
g
e.
Note:
If
y
ou wait more than 15 seconds
between each ke
y
press, the TAD exits
the time settin
g
process. Start a
g
ain at
Step 1.
1. Hold down
CLOCK
until the TAD
beeps. The TAD announces the cur-
rentl
y
set da
y
and displa
y
s the da
y
’s
number (
0
for Sunda
y
,
1
for Mon-
da
y
, and so on).
2. To chan
g
e the da
y
of the week, re-
peatedl
y
press
SKIP
to move for-
ward or
REPEAT
to move backward.
3. Press
CLOCK
. The TAD announces
the hour. To chan
g
e the hour, re-
peatedl
y
press
SKIP
or
REPEAT
.
4. Press
CLOCK
. The TAD announces
the minutes. To chan
g
e the minutes,
repeatedl
y
press
SKIP
or
REPEAT
.
5. Press
CLOCK
. The TAD announces
“AM” or “PM,” and
A
or
P
appears.
Press
SKIP
or
REPEAT
to chan
g
e
this settin
g
.
6. Press
CLOCK
. The TAD announces
the da
y
and time.
Notes:
If the TAD loses AC power, its
clock will keep the correct time for about
one hour.