


7
INSTALLATION
Important
: To be sure your TAD-1006
works properly, follow this sequence
to install it.
1. Select a location (see “Selecting a
Location”).
2. Connect the AC adapter (see
“Connecting the AC Adapter”).
3. Install a backup battery (see
“Installing a Backup Battery” on
Page 8).
4. Mount the TAD-1006 (see “Mount-
ing the TAD-1006” on Page 9).
5. Connect the handset (see “Con-
necting the Handset” on Page 12).
6. Set the
TONE-PULSE
switch (see
“Setting the TONE-PULSE
Switch” on Page 12).
SELECTING A
LOCATION
Select a location for the TAD-1006
that is near a modular phone jack and
an AC outlet, and out of the way of
normal activities. You can place the
TAD-1006 on a flat surface (such as a
desktop or counter-top), mount it on a
modular jack wall plate, or mount it di-
rectly on the wall.
Notes
:
• If the phone line jack is not a mod-
ular jack, you must update the wir-
ing. You can convert the wiring
yourself, using jacks and adapters
available at any Radio Shack
store. Or, you can let the phone
company update the wiring for
you.
• The phone company will charge
you for the installation of neces-
sary jacks.
• The USOC number of the jack to
be installed is RJ11C for a base-
board jack or RJ11W for a wall-
plate jack.
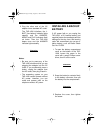
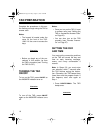
CONNECTING THE AC
ADAPTER
Caution
: You must use a Class II AC
adapter that supplies 12 volts of pow-
er, delivers at least 200 milliamps, and
has a plug that properly fits the TAD-
1006’s
12V DC
jack with its center tip
set to negative. The supplied adapter
meets these specifications. Using an
adapter that does not meet these
specifications could damage the
adapter and the TAD-1006.
1. Insert the small round plug of the
supplied AC adapter into the
12V
DC
jack, then press the adapter’s
cord into the strain-relief slot on
the bottom of the TAD-1006.
illustration
43-768.fm Page 7 Friday, August 13, 1999 2:49 PM