


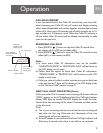

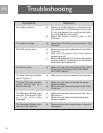
Connecting to a telephone and/or
answering machine
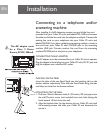
After installing 4 x AAA batteries,connect one end of the line cord
provided into your Caller ID unit's jack labeled TEL.LINE and connect
the other end of the line cord into the telephone wall jack.Connect the
existing line cord on your telephone into your Caller ID unit's jack
labeled PHONE.If you have a telephone answering machine,connect a
line cord from your Caller ID unit's PHONE jack to the answering
machine LINE jack. Connect another line cord from the answering
machine PHONE jack to the jack on your telephone.
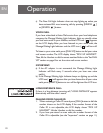
CONNECTING THE AC ADAPTER
The ACadapter must be connected for your Caller ID unit to operate.
Plug the adapter's barrel plug into your Caller ID unit's DC 9V jack and
plug the adapter into a standardAC outlet.
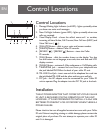
PLACING ON THE DESK
Insert the slots of the two Stand Studs into the matching tabs on the
bottom cabinet respectively.Then slide the Stand Studs along the tabs
until they are locked to the bottom cabinet.
MOUNTING ON THE WALL
1. Drill two 1/8-inch diameter holes,5-1/8 inches (130 mm) apart,into
the wall.Thread a screw (not included) into each hole, letting the
heads extend 1/8 inch from the wall.
2. Align the keyhole slots (on the bottom of your Caller ID unit) with
the mounting screws and slide your Caller ID unit downward to
secure it.
Installation
EN
6
The AC adapter must
be a Class 2 Power
Source,9V DC,200mA
PHONETEL. LINE