


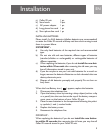


Control Locations
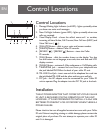
1. Message Waiting Light Indicator (red LED) - lights up steadily when
you have new voice mail messages.
2. New Call Light Indicator (green LED) - lights up steadily when new
calls are received.
3. Visual Display Panel - shows the caller’s name and / or number,
incoming call time & date,Call Counter,New Call icon (NEW) and
Voice Mail icon ( ).
4. [DIAL VM] Button - dials to your voice mail access number.
5. [DELETE] Button - deletes Caller ID records.
6. [REVIEW ] / [REVIEW ] Buttons - views the Caller
ID records.
7. [DIAL] Button - dials the number shown on the display. You also
use this button to set language,area code,time and date and LCD
display contrast.
8. [FLASH] Button - activates 3-Wayconference or Call Waiting calls.
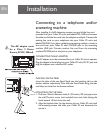
9. TELEPHONE Jack - connect line cord from your telephone into
the jack labeled PHONE at the back of your caller ID unit.
10. TEL LINE Cord Jack - insert one end of the telephone line cord into
the jack labeled TEL.LINE and the other end into your wall jack.
11. DC Jack - the AC adapter must be connected for your Caller ID
unit to operate.Plug the adapter into the DC 9V jack at the back.
Installation
THE AC POWER ADAPTOR THAT COMES WITH YOUR CALLER
ID UNIT IS REQUIRED FOR THE OPERATION OF THE UNIT.
HOWEVER , IT IS RECOMMENDED TO INSTALL 4 X AAA SIZE
BATTERIES TO PREVENT LOSS OF MEMORY WHEN THERE IS A
POWER FAILURE.
Please check to be sure all supplied accessories come with your Caller
ID unit.If there is anything missing or visible damage,please contact the
original place of purchase. Do not attempt to operate your caller ID
unit if it is damaged.
Control Locations
EN
4