


[ 8 ] Getting Started
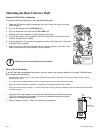
Mounting the Base Unit on a Wall
Standard Wall Plate Mounting
This phone can be mounted on any standard wall plate.
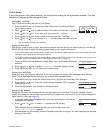
1 Make the AC adapter and the telephone line cord through the hole on the wall
mount adapter.
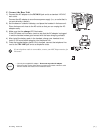
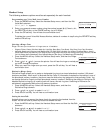
2 Plug the AC adapter into the DC IN 9V jack.
3 Plug the telephone line cord into the TEL LINE jack.
4 Slide the wall mount adapter into the notches on the base.
5 Plug the AC adapter into a standard 120V AC wall outlet. Hook the cord on the
notch of the wall mount adapter.
6 Plug the telephone line cord into the telephone outlet. Hook the cord on the notch
of the wall mount adapter.
7 Align the mounting slots on the base with the mounting posts on the wall. Then
push in and down until the telephone is firmly seated.
Direct Wall Mounting
If you do not have a standard wall plate, you can mount your phone directly to the wall. Before doing
this, consider the following:
• Avoid electrical cables, pipes, or other items behind the mounting location that could cause a hazard when inserting
screws into the wall.
• Try to mount your telephone within 5 feet of a working phone jack to avoid excessive lengths.
• Make sure the wall material is capable of supporting the weight of the base and handset.
• Use #10 screws (minimum length of 1 & 3/8 inches) with anchoring devices suitable for the wall material where the base
unit will be placed.
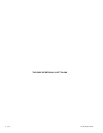
1 Insert two mounting screws into the wall (with their appropriate anchoring device),
3 & 15/16 inches apart. Allow about 1/8 of an inch between the wall and screw
heads for mounting the telephone.
2 Refer to steps 1 through 7 above for mounting the telephone.
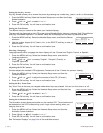
To remove, push u
p
a tab on the wall
mount adapter as
shown.
DO NOT use an AC outlet controlled by a wall switch.
!