Phone Guide
300 Main Street • East Rochester, NY 14445 • Toll Free 1-866-ALLWORX • 585-421-3850 • www.allworx.com
© 2007 InSciTek Microsystems, Inc. All rights reserved. Allworx is a registered trademark of InSciTek Microsystems. All other names may be
trademarks or registered trademarks of their respective owners.
Revised: March 28, 2007
Page 1
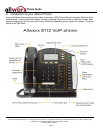
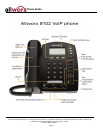
Congratulations! You’re the new owner of an Allworx
®
9102 or 9112 VoIP phone. This phone will make it easy
for you to place and receive calls when using the Allworx System.
1 Getting Started
1.1 What is in the box?
Check out the contents of the box your phone came in. You should have:
• Allworx 9102 or 9112 phone
• Power supply
• Handset with cord
Not included, but will also need:
• Ethernet cable to connect the phone to the network
1.2 Connecting the Phone
We’ve taken all the challenge out of connecting your phone properly. Follow these steps to connect:
1. Plug one end of the Ethernet cable into the Network jack on the back of the phone. Plug the other end
into your Ethernet jack on the wall.
WARNING: Do not connect to an analog phone line.
2. The phone contains a PC jack. A computer may be connected to the network through the phone’s
Computer port.
3. If you’re using Power over Ethernet (PoE), the power to the phone was supplied when you connected
the Ethernet cable. If this is the case, skip to step 5.
4. If you’re not using PoE, connect the power cable into the phone, then plug the other end into an outlet.
It’s a good idea to use a surge protector.
5. After applying power, the phone will initialize itself. You can watch its progress on the phone’s screen.
A normal sequence would include:
a. Allworx Logo appears.
b. Starting network.
c. Loading configuration files.
d. Station Init complete.
e. After successful startup, the phone will display date, time, your presence, your name, and
extension.
f. If the phone does not follow this sequence or displays an error, contact your System
Administrator.


