


9
NOTE: You must connect the handset battery before use.
NOTE: Battery and battery door are packaged together inside a plastic bag
and are separate from the handset.
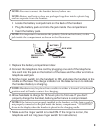
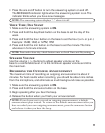
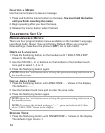
• Locate the battery compartment on the back of the handset.
• Plug the battery pack cord into the jack inside the compartment.
• Insert the battery pack.
NOTE: It is important to maintain the polarity (black and red wires) to the
jack inside the compartment as shown in the illustration.
• Replace the battery compartment door.
4. Connect the telephone line cord by plugging one end of the telephone
line cord into the jack on the bottom of the base and the other end into a
telephone wall jack.
5. Set the ringer switch (on the handset) to ON, and place the handset in the
cradle on the base. The charge indicator on the base turns on to indicate
the handset battery is charging.
NOTE: Handsets may be placed into cradles in either a forward or backward
position and still make contact for charging.
6. Allow handsets to charge for 16 hours prior to first use. If you don’t
properly charge the handset, battery performance is compromised.
NOTE: If the battery is not properly installed in the handset, or if the battery pack is
not properly connected to the jack inside the battery compartment. “NO BATTERY”
shows in the display when the handset is placed in the charging cradle.
7. Make sure the ringer switch is turned ON. If the ringer is not on, the
telephone will not ring (see ringer switch for instructions).
RED WIRE
BLACK WIRE
BATTERY
PRESS DOWN
FIRMLY