


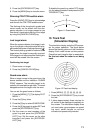
6
Manual speed input
Select MAN at step 2 above, press the [3]
key twice, and enter speed with the ten keys.
Target-based speed input
This mode is used when the ship’s SDME
(log) is not operating properly, ship’s speed
is changed minutely (in case of no log), or
the vessel has no device which detects ship’s
leeward movement (doppler sonar 2-axis
speed log, etc.) and leeward movement is
not disregarded. You may select up to three
targets, and they are marked as R1, R2, R3.
They appear as tracked targets, each shown
in a small circle, but without a vector. When
a plural number of objects is selected, the
mean value is used for stabilization and
speed.
Note 1:
The ATA calculates own ship’s speed
relative to a fixed target. Therefore, when
selecting a target, a larger ground mass or a
long coast line is not suitable as a reference
target because of obscure reference point.
Note 2:
A vector can be displayed for the ref-
erence target. This can be done with TAR-
GET BASED SPEED on PLOT MENU 1.
Note 3:
If a tracked target is acquired as a
reference target it will become a lost target
and cannot be reacquired. Therefore, when
acquiring a reference target, select a target
which is not being tracked. To select a tracked
target as a reference target, cancel tracking
and then acquire it as a reference target.
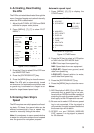
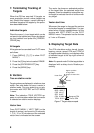
1. Select a small ground mass target (small
island, lighthouse) 0.2 to 24 nautical miles
from own ship.
2. Place the cursor on the target.
3. Press [MENU], [7], [7], [0], [0], [9], [9].
4. Place the cursor on the target and press
the [PLOT SYMBOL] key ([ACQ] key on
the FR-1710/1725/1760DS).
5. Press the [MENU] key.
The reference target mark (dashed square)
appears at the cursor position and the own
ship data label changes from LOG, NAV or
MAN to REF. Note that it takes 60 scan be-
fore a new speed is displayed, indicated by
the target mark changing to a circle. If track-
ing has failed for a reference target, the tar-
get is marked with a lost target mark (symbol
formed with two triangles).
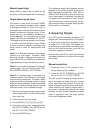
6. Acquiring Targets
The ATA permits automatic acquisition (10
targets) plus manual acquisition (10 targets),
or fully manual acquisition (20 targets) within
a range of 0.2 to 32 miles. The targets are
automatically numbered and the same num-
bers are not used more than once until the
maximum capacity is reached.
Before starting the ATA, check that heading
and speed readouts at the top of the screen
are correct.
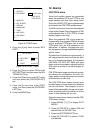
Manual acquisition
1. Place the cursor (+) on a target of inter-
est by operating the trackball.
2. Press the [PLOT SYMBOL] key ([ACQ]
key on the FR-1710/1725/1760DS).
The plot symbol changes its shape accord-
ing to the status as below, with plot number
to the right of the plot symbol. A vector ap-
pears in about 20 antenna scans after acqui-
sition indicating the target’s motion trend. If
the target is consistently detected for three
minutes, the plot symbol changes to a solid
mark. If acquisition fails, the target symbol
blinks and disappears shortly.