


45-5
Cisco CallManager Administration Guide
OL-5378-01
Chapter 45 Cisco IP Phone Configuration
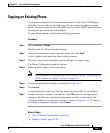
Configuring Cisco IP Phones
Note Add the Cisco VG248 Phone Ports from the Gateway Configuration window of
Cisco CallManager Administration. See the “Gateway Configuration” section on
page 44-1 for configuration information.
Procedure
Step 1 Choose Device > Add a Device.
The Add a New Device window displays.
Step 2 From the Device Type drop-down list box, choose Phone and click Next.
The Add a New Phone window displays.
Step 3 From the Phone type drop-down list, choose the appropriate phone type or device
and click Next. After you choose a phone type, you cannot modify it.
The Phone Configuration window displays.
Step 4 Enter the appropriate settings as described in Table 45-1.
Only the settings that are appropriate to the chosen phone type appear in your
window.
Step 5 Click Insert.
A message displays stating that the phone has been added to the database.
Step 6 To add a directory number to this phone, click OK and enter the appropriate
settings in the Directory Number Configuration window as described in the
“Directory Number Configuration Settings” section on page 45-34. To return to
the Phone Configuration window, click Cancel.
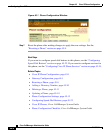
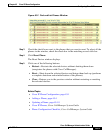
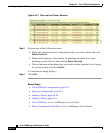
After you add a Cisco IP Phone to Cisco CallManager Administration,
information from the RIS Data Collector service displays in the Phone
Configuration window. When available, the IP address of the device and the name
of the Cisco CallManager with which the device registered display as illustrated
in Figure 45-1.