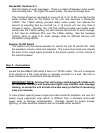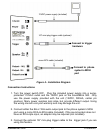
Bandwidth, Switches 2-3
Sets the fidelity of audio messages. There is a trade-off between audio quality
and recording time: The higher the audio quality, the less the storage time.
The minutes of memory equipped on your unit (4, 8, 16, or 32) is printed on the
serial number label on the bottom of the unit, and assumes a bandwidth
3.5KHz. The 7.0KHz setting provides better audio quality, but reduces the
amount of recording time by one-half (i.e. a 16 minute unit can only store 8
minutes of audio). Similarly, the 7.0E KHz setting provides even better audio
quality than the 7.0KHz setting, but also reduces the amount of audio storage,
in this case an additional 25% over the 7.0KHz setting. See the message
memory table on page 8 for audio storage times for different memory and
bandwidth configurations.
Speaker On/Off Switch
This switch turns the internal speaker on (switch on) and off (switch off). Note
the speaker’s volume cannot be adjusted. The output level knob only adjusts
the level of the output signal provided to the phone system, not the volume of
the internal speaker.
Step 2 – Connections
Locate the SoundBrick 500 within 6 feet of a 110VAC outlet. The unit is designed
to be placed on a flat, level surface or securely mounted on a wall. Be sure to
leave clearance for connections and adjustments.
IMPORTANT NOTE:
Devices that emit strong electromagnetic fields such
as computer monitors and fluorescent lights may interfere with message
loading, so locate the unit at least a few feet away (or farther if necessary)
from such devices.
To help protect against power surges and other electrical problems, the use of a
quality surge suppressor strip (which is different from a standard multi-outlet
power strip) is strongly recommended. Damage caused by power surges,
lightning, or other electrical problems are not covered under warranty.
SoundBrick 500 01/08/2001
10


