


System Operation
Artist Elite wireless receivers and transmitters are extremely
versatile components with many operating features and
functions, some of which are not obvious. As a result, we
suggest the following approaches to assure a “comfort level”
with any new equipment:
1. Begin using a single receiver/transmitter pair at their Default
(“
DEF”) settings, to become familiar with equipment
functions and operation befor
e doing any customizing.
(If the Default fr
equency is not usable in your area, change
the frequency to one that is suitable.)
2. Before installing/starting up a large multi-channel system,
explore the functions and operation of only two or three
receiver/transmitter pairs together.
Basic Operation – Single AEW-R4100 receiver system:
T
ur
n down the AF Level of the mixer or amplifier
. Switch on the
r
eceiver
. Do
not switch on the transmitter yet.
T
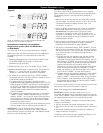
urning on the Receiver
The Alert indicator and the LCD window lights up; the normal
operation LCD display appears after 1–2 seconds. If any of the
bars show in the “
RF” bar
-graph meters, ther
e may be RF
interference in the area. If this occurs, select another frequency
as explained below. (If the Meter Hold function has been
selected, one of the RF bars in each column will be flashing,
indicating the lowest RF levels received.)
Selecting/Setting Receiver Frequency
Selection of the desired operating frequency is made through
the function menus. There must be no local interference on that
frequency. If the Default frequency (lowest in band) happens not
to be usable, the receiver frequency may be set manually, or by
using the IntelliScan function.
•
Manual frequency selection:
Adjust the r
eceiver frequency
as detailed in the next section.
•
IntelliScan frequency selection:
The r
eceiver’s IntelliScan
function may be employed to select a usable operating
frequency automatically, as detailed in the section following
on page 25.
Note: Once the receiver frequency is set, the associated
transmitter must be set manually to the receiver’s exact
frequency. See page 26 for the correct procedure.
Setting Receiver Frequency Manually
1. Touch the Mode/Set button once. “FRQ” appears on the first
line of the LCD window with the current frequency setting on
the second line. (The receiver is now in Menu mode.)
2.
Touch the Mode/Set button again. The small flashing word
“EDIT” appears at the bottom of the window. (The receiver
is now in Edit mode.)
3. Use the Up/Down arrow buttons to change the frequency.
Touch either arrow for single steps, or hold either arrow for
rapid cycling through the band. Frequencies “wrap around”
to the other end of the range when the top or bottom of the
band is reached. Choose a frequency appropriate for your
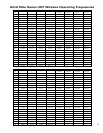
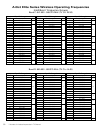
area, avoiding frequencies with active TV channels. (See the
frequency listings on pages 29 and 30.)
Note: The top line of the LCD indicates when fr
equencies
belong to IntelliScan gr
oups. Asterisks (*) are displayed in front
of “FRQ” to indicate membership in one of mor
e of the three
groups (Figure R on page 25). See page 30 for frequency group
listings.
4.
T
o choose this fr
equency,
hold the Mode/Set button until the
word “STORED” appears in the receiver’s window. (If you do
not wish to complete this selection,
touch the Mode/Set
button
once. The wor
d “ESCAPE” appears briefly in the
window
, and the r
eceiver r
etur
ns to Menu mode.)
5. When finished entering a frequency,
touch the Up arrow
button
once. The display reads “QUIT.”
There are several ways to quit, depending on whether the
cur
r
ent Name is to be r
etained or the fr
equency stor
ed to a
user pr
eset. See page 14 for help with Quitting and saving
changes.
T
o quickly store the new frequency into the “NAME?”
location,
touch the Mode/Set button. The receiver shows
“NAME?” in the top line and the new frequency in the
bottom line.
Note: Y
ou must now set the transmitter to the exact same
frequency for the system to operate!
24
The details of setting up and operating a multi-channel
system vary greatly in complexity, depending upon the
number of receivers and nature of the system. Because the
feature-rich nature of AEW units can greatly increase this
complexity, we suggest starting with a simpler, straightfor-
ward setup and use to become familiar with the
equipment and its capabilities.
Single AEW-R4100 receiver system:
Begin using a receiver and transmitter at their Default
(“
DEF”) settings, to become familiar with equipment
functions and operation before doing any customizing.
(If the Default frequency is not usable in your area,
manually change only the frequency to one that is
suitable.)
Single AEW-R5200 receiver system (two channels):
Start out using only Channel 1, treating this the same as
the single AEW-R4100 above.
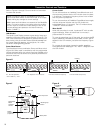
Multiple-receiver system with link cables only:
The link cables provide data and control between
receivers. The IntelliScan
™
feature scans for clear channels
and assigns non-conflicting frequencies to all linked
receivers. (If IntelliScan is not used, the receiver
frequencies may all be set individually/manually
, as with
any standard receiver, selecting frequencies that are
within the same IntelliScan groups listed on page 30.)
Multiple-receiver system with Ethernet-connected
computer inter
face:
Refer to the separate AEW Control Interface manual for
setup and operation of a computer
-based system. Basic
har
dwar
e aspects of the receivers, and all transmitter
setup/operating information, are in the manual you are
now reading.
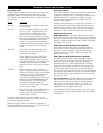
Touch: A momentary press of the Mode/Set button. It is
used to enter Menu mode, to enter Edit mode, or to Escape
without making any changes to cur
rent settings.
Hold: A press and hold (about two seconds) of the Mode/Set
button. It is used to accept a new setting when the receiver
is in Edit mode or to save the current settings to one of the
five user-defined name presets or the internal memory
location (“NAME?”).