


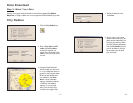


Importing Custom Places
CoPilot’s Custom Place Import Wizard enables you to import addresses from
your Outlook Contacts database, an Excel file, or text file. (If you are using
another type of database or contact manager, you can export your contacts/
locations to an Excel or text file before importing them into CoPilot.) These
points are then added to CoPilot’s POI database in a category and type of your
choice (the default category is “Custom”). Once they are in the database, they
are displayed on maps as pushpins and included in search results when you search
for points of interest on your Pocket PC or in the Trip Planner window on your
desktop/laptop.
NOTE: CoPilot now allows importing of multiple POIs with the same name (e.g.
an entire database of “Starbucks”).
To access the Wizard, choose Import Custom Places from the Tools menu in
Planning Mode on the desktop, then follow the step-by-step instructions given by
the Wizard.
Steps for Importing:
- 25 - - 26 -
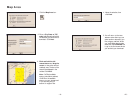
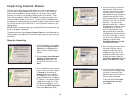
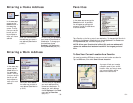
1. In Planning Mode on your desktop/
laptop, choose Import Custom
Places from the Tools menu to
open the Import Custom Places
Wizard.
2. Choose Import from Microsoft
Outlook or Import from an
existing file (this can be a .txt
text file or an Excel file). Click
Next.
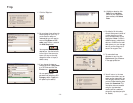
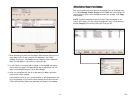
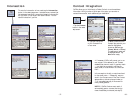
4. In the next screen you'll see the
data from your file sorted into
columns. If the columns you see in
the screen have not sorted the
address data correctly, you need to
indicate which delimiter CoPilot
should recognize when it separates
the fields in your file into columns.
Each field — e.g. name, street
address, city, state, etc. — needs to
be separated by a delimiter such as
a tab, semicolon, or comma. If
your file uses a delimiter other
than a comma, tab, or semicolon,
click Other and type the delimiter
in the box to the right. If the first
row of your file consists of column
headings, you should check
Column headings in first row.
Click Next when ready.
5. Now, following the instructions on
the screen, click each column
heading and match the column
headings with your data. To be
accepted by CoPilot, each import-
ed place must have at least four
fields: Name, Address1, City, and
State. Click Next when ready.
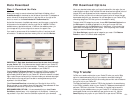
6. In the next screen, following the
instructions, you can assign a name
to the set of columns you just
defined to save you time the next
time you import addresses.
To skip this step, uncheck Save
the columns as a new set.
Click Finish.
3. In the next Wizard screen, type the
path to the file you want to import
or Browse for it, and use the
Category pick list to indicate a
POI category for your imported
places (by default they are assigned
to “Custom”). You can also choose
a Type from the pick list. To edit
the type name, highlight it on the
pick list and click Edit Type Name
below. Click Next when ready.