- 8 -
EnglishFrançaisNederlands
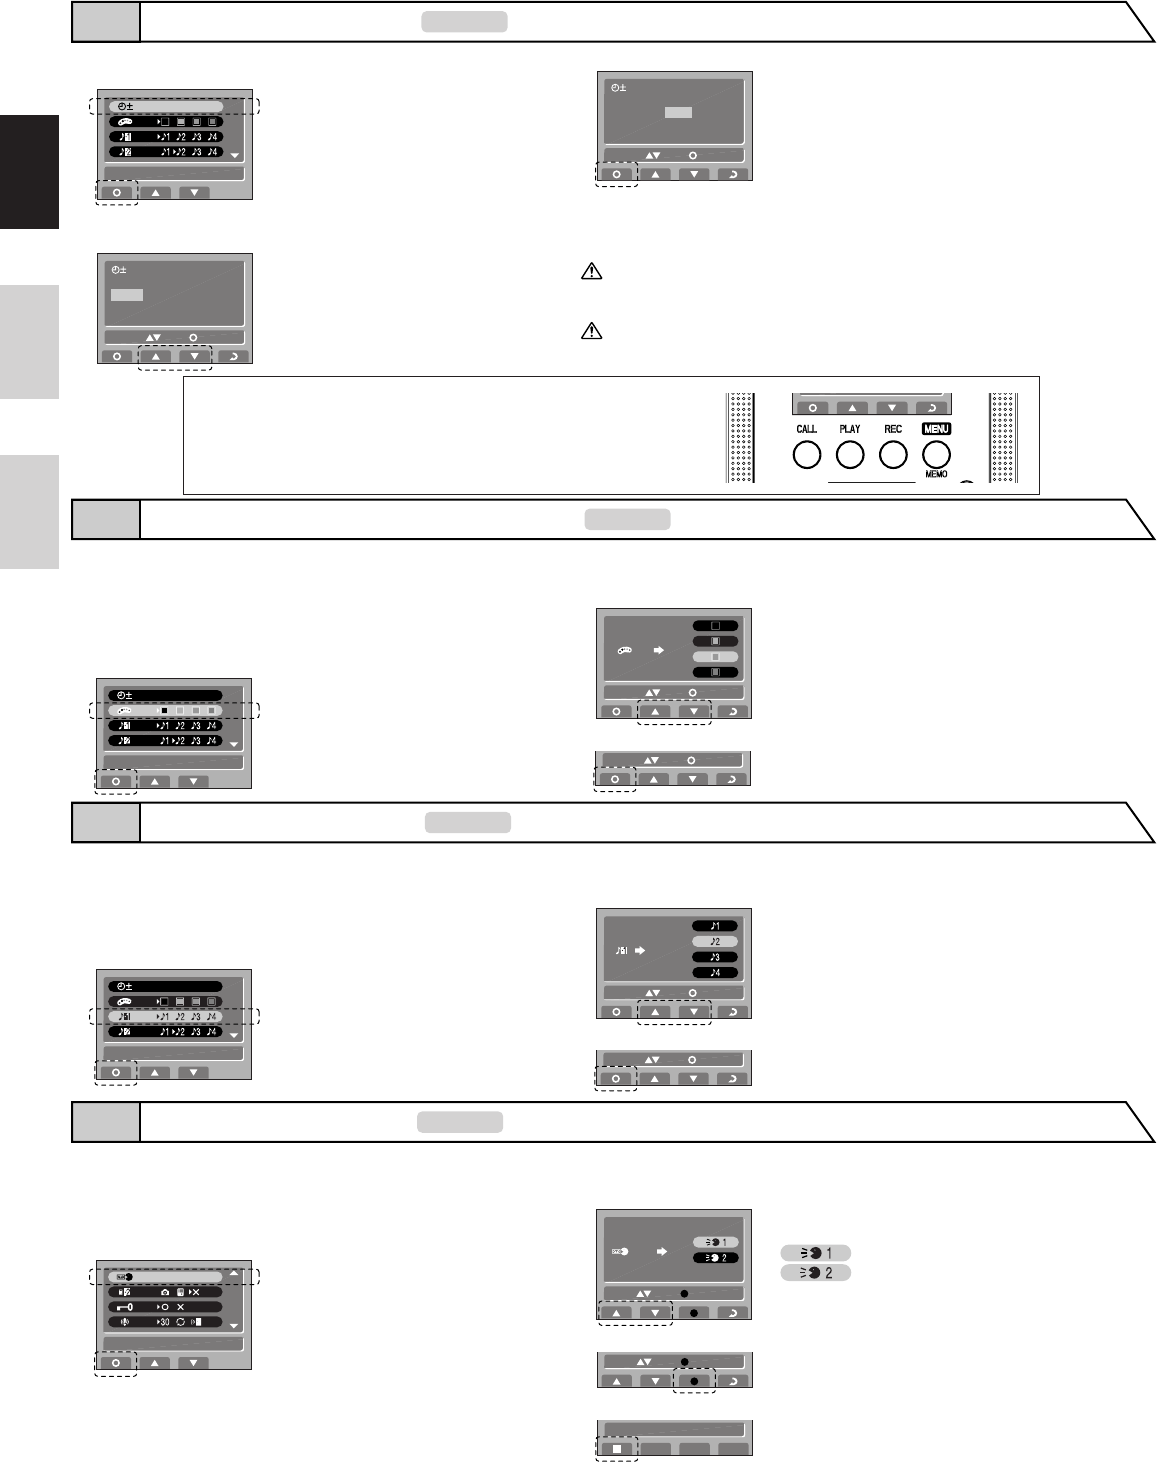
Press CALL button to set the "Year" and move the cursor to "Month".
In the time setting screen, press PLAY button or REC button to
set the "Year".
After performing steps 1 and 2 in section 7-1, select "SET
THE DATE/TIME" and press CALL button.
1. If there are no operations for approx. 1 minute during the setup mode, the
setting will end automatically. If the settings end while incomplete, start
again from the beginning.
2. A maximum error of Ȁ 1 minute can occur in the displayed time over a
month.
Perform the same steps to set the "Month", "Day", "Hour" and "Minute".
After setting "Minute", press CALL button to complete the settings.
Press TALK button to return to the standby mode.
NOTES: Button operations for setting date/time
• PLAY button (press once): The date/time increases by one.
• PLAY button (press and hold for 1 second or more): The date/time increases in succession.
• REC button (press once): The date/time decreases by one.
• REC button (press and hold for 1 second or more): The date/time decreases in succession.
• MENU/MEMO button: Return to the setting screen without saving the setting.
• CALL button: Confirm the setting.
In the "SET THE BACKGROUND COLOR" screen, press PLAY button or
REC button to select the desired color. The background color changes to the
selected color, enabling you to check the color.
Press CALL button to complete the settings and return to the setting screen.
The background color for the screen can be selected from 4
alternatives: "Black", "Orange", "Green" and "Blue".
When a sub monitor station is connected, the screen background
color for the sub monitor station also changes.
After performing steps 1 and 2 in section 7-1, select "SET THE
BACKGROUND COLOR" and press CALL button.
The chime tone for the video door station can be selected from
4 sound types.
After performing steps 1 and 2 in section 7-1, select "SELECT
CALL TONE (DOOR1)" or "SELECT CALL TONE
(DOOR2)" and press CALL button.
Press CALL button to complete the settings and return to the setting screen.
In the "SELECT CALL TONE" screen, press PLAY button or REC button to
select the desired chime tone. The selected chime tone sounds, enabling you to
check the sound.
After approx. 10 seconds have passed, press CALL button to complete the recording.
Press the REC button to record a message. Recording is possible for approx. 10 seconds.
In the message recording screen, press CALL button or PLAY button to select
the record location. If a message has already been recorded, the selected
message is played, enabling you to check the contents of the recording.
After performing steps 1 and 2 in section 7-1, select "RECORD
MESSAGE" and press CALL button.
A maximum of 2 messages can be recorded (approx. 10 seconds
per message).
Message 1 for entrance
Message 2 for entrance
JF-2MED
SET THE DATE/TIME7-3
JF-2MED
SET THE BACKGROUND COLOR7-4
JF-2MED
SELECT CALL TONE7-5
JF-2MED
RECORD MESSAGE7-6
2006 01 JAN 00
:
00
SELECT SET
2006 01 JAN 00
:
00
SELECT SET
SET THE DATE/TIME
2006 01 JAN 00:00
SELECT SET
SET THE BACKGROUND COLOR
2006 01 JAN 00:00
3
4
5
3
1
1
2
2
SELECT SET
SELECT SET
SELECT CALL TONE
(
DOOR1
)
2006 01 JAN 00:00
1
2
3
SELECT SET
SELECT RECORD
RECORD MESSAGE
1
2
3
4
SELECT RECORD
RECORDING
(
8 SEC. REMAINING
)
