


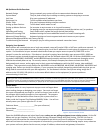
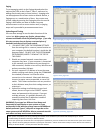


Figure 14: Group Blocking to, setting permissions. See page
193 of the AN guide.
Note: In the example MI configuration, we are setting up audio
channel 1 for a BGM source and channel 2 for a PBX connection.
Advanced: Background Music and Camera Call Up
Give the quantity of MI’s is given in the Equipment
Registration tab and then the Multi Interface tab may be
used. Each AN-8000MI provides 2 paging amp connections
which you can configure using the Function Settings tab. The
Audio I/O may be used to bring in a music source, select
BGM on that channel. Once the background music is chosen
for one of those 2 outputs, each Exchange or IP Master
Function Settings(1) tab can be used to set up to 8 different
MI channels, which involves an equipment number (AN-
8000MI’s are not named) and the input (1 or 2). Select the
equipment number for the MI that has your BGM input, then
select which of the 2 inputs on the MI it comes in on. Then
go to the Function Settings for each Station (Function
Settings2 if configuring an IP Station) and check the box next
to Receives BGM and tell it which BGM channel (1-8) it uses.
To operate, a master can control its own channel by using
the sequence Function + 1 + X (where X is 1-8 or 0 to turn it
off).
For Camera call up the Contact I/O tab contains all
the outputs needed to tie in to the alarm inputs on the 3
rd
party DVR you are integrating with. Be sure to give it a
Contact Output Access Number so it can be manually
triggered by hitting Function + 30 + Contact Output Access
Number. Once you have the contacts set up, switch to the
Door station’s Station Tab and set the contact number for
CCTV Call up in the Function Settings tab. You have up to 8
masters which the relay will fire.
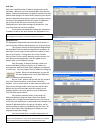
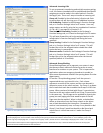
Figure
16
: Multi Interface Audio I/O tab, see page 173.
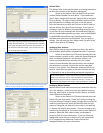
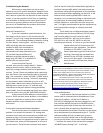
Figure 17: Multi Interface Contact I/O tab, see page 175.
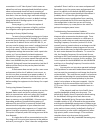
Figure 15: Function Settings2 for CCTV relay trigger, see page 184.
Note: If the contact is being used for door release, you may specify
the contact as such in the Door Remote field of a Station’s Function
Settings tab. This will enable the relay to fire during
communication using the sequence Transfer + Function + 0 for any
door (the system will only fire the relay for the door you are
currently talking to
)
.