


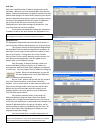
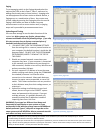


Station Table
The Station Table is the tab that allows us to assign extensions
to allow the end user to dial between equipment.
Switch to the Station Table tab and fill out the blank
column Station Number for each device. If you need more
than 2 digits, change the Station No. digits field first and press
Enter to accept. To assign a Station Number, double click on
the field you wish to change, and your curser will appear.
Enter the extension you wish the End User to dial in order to
call that station, then press Enter to accept. If you have an
exchange, each Line Number (corresponding to the 16 ports
on the back of each exchange) will also need to be filled out
with the hardwired equipment you have, such as AN-8000MS
or AN-8050DS selected from the Type drop down menu
available when you select the field under Type you wish to
change. You may also give it an 8 digit name, for caller ID on
masters that have an LCD display.
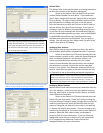
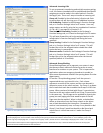
Setting up Door Stations
Door stations have a single call button on them, we need to
tell the button which master to Speed Dial when it is pressed.
Switch to the Station (or IP Station) tab and select the
Station number you wish to edit. Under the Speed Dialing tab
there is a Master Station No. that the door station’s call
button can speed dial when pressed, put in the master
station’s Station Number that you the station will call when
the call button is pressed. Repeat this step for each door
station in your system. See Advanced: Incoming Calls if you
wish for more than one master to be able to answer the call,
or if you wish to set up forwarding and transferring options.
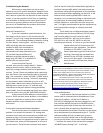
Setting up Master Stations
Master stations have many functions that need to be explicitly
set in the software, such as how calls are handled, how long
they ring, what master to transfer to when absent, and what
music channels are available.
Switch to the Station (or IP Station) tab and select the
Station No. you wish to edit. Under the Function Settings (or
Function Settings2 if using IP master) change the Incoming Call
mode to Continuous Call, which will allow the End User the
option of taking the call when they are ready or just ignoring
it. Repeat this step for each master. If you are setting up any
transferring, forwarding or if you want other master station to
answer a speed dial from a door station, see Advanced:
Incoming Calls for more information. If you are setting up
background music channel, volume levels, and a portion of
CCTV integration see Advanced: Camera Call up and
Background Music for more information.
Figure 5: Station Table, see page 155 of the AN-8000 guide.
Figure 6: Speed Dialing for a door station, page 185 for an IP door
station, or page 190 for an exchange connected door station.
Figure 7: Function Settings2 for a master station, page 183 for an
IP master or 187 for an exchange connected master station.
Note: When assigning extensions remember that there are
speed dials that involve 0, 7, 8, 9, (and off hook) in addition
to the eight Autodials located on some of the handsets, so
no extension should start with 0, 7, 8 or 9 unless you plan
on not using those speed dials.
Note on Door Release: To wire up door release, follow the diagram on
page 113 or 118 section 3-25 or 3-30. Any master in communication
with the door may press the key combination Transfer + Function + 0 to
activate the relay added by the installer. No programming is necessary.