


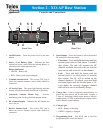
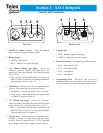
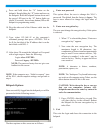
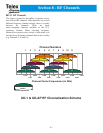
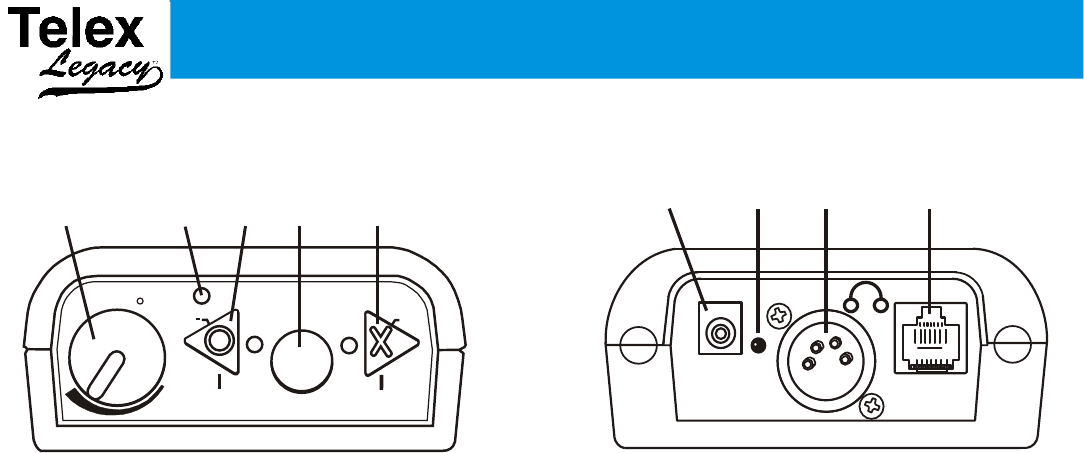
1.
On/Off & Volume Control – Turns the beltpack
power on/off and controls headset volume.
2. Battery Light –
• GREEN - Battery OK
• RED - Battery Low (needs charged)
3. "O" Channel Button and Light – Selects the
“Offense” intercom channel. The light next to the
button will light when selected. Also controls headset
Mic (-) level:
• Mic (-): press and hold talk button, then press and
hold "O" button. Listen for voice prompts in headset.
Adjust headset mic level lower (-).
4. Talk Button – When pressed the microphone path is
enabled. This button has two operational modes:
• Momentary – Pressed and hold for over ½ second.
• Latch on/off – Tap button and the microphone path
is enabled. Tap again to turn off.
5. "X" Button and Light – Selects the “Defense”
intercom channel. The light next to the button will light
when selected. Also controls headset mic (+) level:
• Mic (+): Press and hold talk button, then press and
hold "X" button. Listen for voice prompts in headset.
Adjust headset mic level higher (+).
6. Charge Jack – Used to charge the internal battery.
Accepts a 5.5mm x 2.5mm plug with the center
positive. Must be supplied with a 12VDC regulated
power supply with at least a 400mA current capacity.
7. Charge Light.
• RED = Beltpack battery is charging.
• GREEN = Beltpack battery is charged.
8.
Headset Connector – Standard 4-pin XLR connector.
• Pin 1 = Microphone GND
• Pin 2 = Microphone HOT
• Pin 3 = Headphone +
• Pin 4 = Headphone –
9. Programming Jack – This RJ-45 jack is used for
programming the unit at the factory. It can also be used
for changing the user’s password and encryption code.
Section 3 - XO-1 Beltpack
Controls and Connections
Telex
R
MIC
OFF
BATTERY
TALK
MIC +
X
O
1 2
3
4
5
3-1
CHG
EXT
6
7
8
9
Top View
Bottom View