


9.
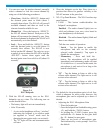
Press and hold down the “X” button on the
beltpack. Keep holding the “X” button and turn-on
the beltpack. Hold the beltpack button down until
the green LED next to the “X” button lights up
(about 20 seconds), then release button (Places the
beltpack in programming mode).
10. Plug the other end of the Ethernet cable into the
beltpack.
11. Type, telnet 192.168.1.X at the computer’s
command prompt, then press <ENTER>. Fill in
for X the last digit of the IP address that is on the
back label on the XO-1.
12. After about 20 seconds the beltpack will respond
with a login request. Enter the following:
Login: telex <ENTER>
Password: legacy <ENTER>
NOTE: The password entry does not give user
feedback to the screen.
NOTE: If the computer says, “failed to connect”, turn
off the XO-1, check computer settings, and go back to
step 6.
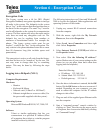
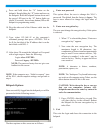
Beltpack Options
Once successfully logged into the beltpack you will be
presented with the following screen:
The three options on this screen are as follows:
1.
Enter new password
This option allows the user to change this XO-1’s
password. The default from the factory is legacy. The
user is never allowed to change the login name of
telex.
2. Enter new encryption key
The user must change the encryption key if this option
is selected.
1. When “2” is selected the phrase, “Enter new
encryption key” appears.
2. Now enter the new encryption key. The
maximum length is 80 characters. Any
combination of letters/numbers/punctuation
may be used. Even a sentence such as, “My
offensive is number 1 in the state”, may be
used as the key. The key is upper and lower
case sensitive.
NOTE: A character is letters, numbers,
punctuation, spaces, etc.
NOTE: The “backspace” keyboard button may
not work on all computers using Telnet, use the
delete button instead if this is the case.
CAUTION: Write down the key or use one
that you can remember, because ALL
beltpacks must have the same key entered in
order for communication.
3. Press <ENTER> after the key is typed. This
will place the key in the software. Reboot
the beltpack for the new encryption key to
take effect.
3. Exit
This exits the login and closes the connection to the
beltpack.
6-2