


SA7—8
Procedure for installing SMT R6:
1. Unpack from cardboard protective holder and study how R6 is made, using the magnifier if necessary.
2. Notice that both ends are metallic - these are the soldering points.
3. Lightly pre-tin the PC board trace points where R6 is to be positioned. Do not make too heavy a solder
build up.
4. Holding R6 in position with tweezers, touch one end and the PC trace with the soldering tip. The solder
should flow nicely. Remove the iron and allow the joint to cool while holding R6 in place.
5. Repeat for the other end of R6.
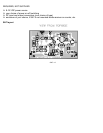
14. R6 properly installed.
Substitution of a small 47 ohm conventional resistor may work out in some applications but it is not
recommended. If you somehow destroy R6 on your first try, a request and SASE to the Ramsey factory will
get you another.
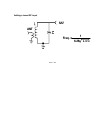
Wiring of your SA7 pre-amp PC board is now complete. It's time to work out the DC voltage supply and input-
output connections.