


YML871 Rev1 V90 VoIP Phone User GuideV90 VoIP Phone User Guide
www.netcomm.com.au 15
Phone Settings
Setting the LCD Default display
You can set up the phone LCD to display two lines of customize text during idle condition.
To set the Vendor Name (title) and Title on LCD (subtitle):
On the Phone Settings screen under Configurations menu, enter the text for these two fields as desired. If the
title field is not filled, the phone will display the phone number assigned by default.
Auto Dial
When enabled, the V90 will automatically dial the numbers that it has received so far after the auto dial period
has elapsed. To disabled this feature, click on Disable on the Auto Dial Menu. The default Auto dial is enabled
with the Auto Dial Timeout of 5 seconds.
Missed Call LED Indication
By default, the phone LED will flash to indicate that there is a missed call. To disable this feature, tick Disable
on Missed Call LED Indication menu.
Menu Configuration Password
By default, the phone prompts for a username and password to enter into the Device Config sub menu (Press
Menu, Device Config). To disable this feature, tick Disable on the Menu Configuration Password option.
Tools
Performing an Online Upgrade
WARNING! Performing an online upgrade is for experienced users or network administrators only!
To prepare the V90 VoIP Phone for online upgrade:
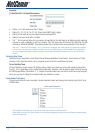
1. Click Tools on the left menu and then Online Upgrade.
2. Enter the IP address or domain name of the upgrade server and package name (e.g.
http://202.44.167.165/V90Upgrade/V90S-3.08-9.pkg).
3. Click Start.
4. The message below appears when the firmware upgrade is completed. Click OK to continue.
“Ugrade successful!”
“Current version: xxxxxxxxx”
WARNING!!! Do not disconnect any cables or close the web browser until the “Rebooting, Please Wait…”
message appears.
Notes: The unit can also be upgraded via FTP or TFTP server. Please follow the instructions above and use the respective address for
the FTP or TFTP Server.
Changing password of the unit
To change the unit password, click on Tools and then Change Password. Enter the new password and click
on Change.