


Grandstream Networks, Inc. HT-502 User Manual Page 5 of 35
Firmware 1.0.0.39 Last Updated: 03/2007
CONFIGURE YOUR HT–502
Configuring your HT–502 and connecting the unit to the VoIP network is very simple. The HT–502 is easy to
configure using the embedded GUI pages and the following five (5) steps outlined below. Examples of the
GUI Interfaces can be downloaded from: http://www.grandstream.com/user_manuals/GUI/GUI_HT502.rar
.
Before you begin, please verify the contents of the HT–502 package.
EQUIPMENT PACKAGING
Unpack and check all accessories. Equipment included in the package:
• one 12V universal power adapter
• one Ethernet cable
• one device unit
• one HT502 stand
CONNECT YOUR ATA
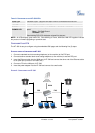
First, familiarize yourself with the features of the HT–502. The HT–502 has two FXS ports. Each FXS port
can have a separate SIP account. This is a key feature of HT–502. Both ports can make calls
concurrently.
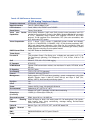
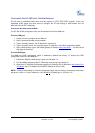
FIGURE 1: CONNECTING THE HT–502
T
ABLE 1: DEFINITIONS OF THE HT–502 CONNECTORS
Power Cable
Power adapter connection
WAN Port (RJ-45)
Connect to the internal LAN network or router.
LAN Port (RJ-45)
Connect the LAN port with an Ethernet cable to your PC.
RESET
Factory Reset button. Press for 7 seconds to reset factory default settings.
PHONE1 (RJ-11)
FXS port to be connected to analog phones / fax machines.
PHONE2 (RJ-11)
FXS port to be connected to analog phones / fax machines.
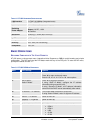
There are five (5) LED buttons that help you manage the status of your HandyTone.
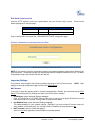
HT-502
B
ac
k Vi
e
w
RJ-45 Ports
10/100 Mbps
Reset
RJ-11 FXS Ports
(Phone)
Power
Supply
(12V)
HT-502
Fr
o
n
t
Vi
e
w
Display LEDs
(green)