


Auto Line Feed System
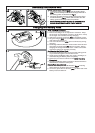
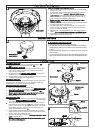
How the automatic line feed works (P)
1. When initially switching on the trimmer, a small length
of line is fed out.
2. A ‘clattering’ noise will be heard when the nylon line
hits the line cutter. DO NOT BE ALARMED this is
quite normal. After approximately 5 seconds the line
will be cut to the correct length and the noise will re-
duce as the motor reaches full speed.
• Make sure the motor is up to full speed before trim-
ming or edging.
3. If the noise of the nylon line being cut cannot be heard,
more line will need to be fed out.
4. To feed more line, it is first necessary to to allow the
motor to stop completely, then re-start, allowing the
motor to reach full speed.
5. Repeat step 4. until you hear the line hitting against the
cutter. (Do not repeat this procedure more than 6 times)
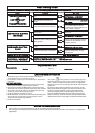
6. If problems are experienced with the automatic line
feed refer to Fault Finding Chart.
P
line cutter
To manually feed the nylon line (Q)
1. If required line can be fed out manually.
2. To operate, press and release manual line feed button,
whilst gently pulling on the line until it reaches the line
cutter.
3. If the line extends past the line cutter, too much line has
been fed out.
4. If too much line is fed out, remove the spool cap and click
spool anti-clockwise until the line is at the desired length.
Manual line feed
Q
manual line
feed button
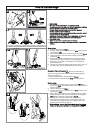
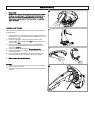
Cutting Head
To remove spool cap
1. Press and hold in the two cap release latches. (R).
2. Pull
cap away from the spoolholder. (R).
When refitting the spool cap
1. Keep all areas of the cap and spoolholder clean. Fail-
ure to do so may prevent the cap being securely lo-
cated in the spoolholder.
2. Replace the cap, pressing firmly DOWN
towards the
spoolholder to ensure cap is fully located.
3. Check that the cap is correctly fitted by trying to remove
it without depressing the two latches.
To replace nylon line.
For your convenience it is recommended you buy spool and
line complete. Nylon line only is also available. Both are
available from Husqvarna UK Ltd. stockists.
To fit spool and line complete:
1. Remove old spool.
2. Place new spool into spoolholder with cut out area of
the
spool in line with eyelet as shown in figure S.
3. Release line from cleat and feed line through eyelet (S).
• Ensure spool is fully located by gently rotating it during fit-
ment, whilst keeping the spoolholder steady.
4. Refit the cap.
To fit nylon line only:
• Remember!Your product is designed to use only nylon
line with a maximum diameter of 1.5mm
. Use only gen-
uine Flymo nylon line.
1. Take approximately 10 metres of line. Insert 15mm of
line into the hole in the spool (T) and wind line in the di-
rection of the arrows on the top of the spool. Leave ap-
proximately 100mm of line unwound and place into
cleat as illustrated in figure T1.
2. Care should be taken to ensure that the line is neatly
coiled on the spool. Failure to do so will impair the effi-
ciency of the automatic line feed.
3. Then fit spool as described in ‘To fit spool and line com-
plete’, section above.
Always return the product to its normal operating posi-
tion before switching on.
Cap
Cap release
latch
Spool
Spoolholder
Eyelet
R
S
T
Cleat
Cut out area
of spool
Eyelet
T1