


10. Do not charge the battery or use the unit in an explo-
sive or corrosive environment. Avoid areas where
flammable liquids or gases are present to avoid cre-
ating a fire or explosion.
11. Do not attempt to repair the unit including the battery.
Nylon line replacement and cleaning the unit are the
only items suitable for user maintenance.
12. Do not insert any object into the motor area. Keep
free of debris to avoid overheating.
13. Do not incinerate or mutilate the battery. Batteries
contain hazardous chemicals. Dispose of properly.
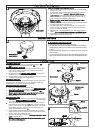
Preparation
1. While using your product always wear substantial
footwear and long trousers.
2. Before using the machine and after any impact, check
for signs of wear or damage and repair as necessary.
3. Inspect the area to be cut before each use. Remove
all objects such as stones, broken glass, nails, wire,
string etc, which can be thrown or become entangled
in the trimmer head.
4. Before use, inspect the area for wildlife, especially
hedgehogs.
5. Check that the cutting head, spool and cap are fitted
correctly.
Use
1. Use the trimmer only in daylight or good artificial light.
2. Avoid operating your trimmer in wet grass, where feasible.
3. Take care in wet grass, you may lose your footing.
4. On slopes, be extra careful of your footing and wear
non-slip footwear.
5. Do not walk backwards when trimming, you could
trip. Walk, never run.
6. Never operate the trimmer with damaged guards or
without guards in place.
7. Never fit metal cutting elements.
8. Keep hands and feet away from the cutting means at all
times and especially when switching on the motor.
9. Keep cutting head below waist level.
10. Do not lean over the trimmer guard whilst trimming or
edging - objects may be thrown by the cutting line.
11. Beware of cut-off pieces of nylon line ejected during use.
12. If you hit an object, do not use your trimmer until you
are sure that the entire trimmer is in a safe operating
condition.
13. If the trimmer starts to vibrate abnormally, check immedi-
ately. Excessive vibration can cause injury.
Maintenance and storage
1. Keep all nuts, bolts and screws tight to be sure the
trimmer is in safe working condition.
2. Replace worn or damaged parts for safety.
3. Only use the replacement cutting line specified for
this product.
4. Only use replacement parts and accessories recom-
mended by Husqvarna UK Ltd.
5. After any maintenance in dealing with the cutting line,
always return the product to its normal operating po-
sition before switching on.
6. To avoid the risk of injury keep fingers and hands
clear of the line cutter on the leading edge of the guard.
7. Clean unit with a dry cloth. Never use metal objects
to clean the unit.
8. Inspect and maintain the trimmer regularly. Any repairs
must be carried out by an authorised repairer.
9. Store the product in a cool, dry place and out of reach
of children. Do not store the product outdoors.
10. Allow the product to cool for at least 30 minutes be-
fore storing.
Battery Pack
Battery Pack Care
1. If over a period of time the Battery Pack quickly runs
down after a full 6 hour charging period, a
replacement Battery Pack is needed.
2. There will be some charge present in the Battery Pack
but to ensure maximum running time, charge your
Battery Pack for 6 hours before first use.
3. To prevent permanent Battery Pack damage, never
store in a discharged condition.
4. Contact your local approved service
centre/dealer/distributor for a replacement Battery
Pack and for safe disposal of your old Battery Pack.
5. Battery
18 Volt 1.6 AmpHour "High Power"
Sealed for Life No maintenance required
• IMPORTANT
DISPOSE OF YOUR OLD BATTERY PACK SAFELY
DO NOT CUT OPEN, BURN OR INCINERATE.
Winter Storage
1. Fully charge for 6 hours before winter storage.
2. Re-charge the Battery Pack every 3 to 4 months for a full
6 hour charging period to top up the battery charge dur-
ing winter storage.
3. Avoid extended storage without re-charge.
4. Store in a cool dry place.
For further information on Battery Pack replacement contact
Husqvarna UK Ltd. Customer Service direct:-
Telephone: 0844 844 4558 UK 1800 882 350 ROI Fax:
01325 302530
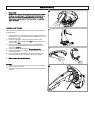
Assembly Instructions
C
A
1
2
B
1
2
1
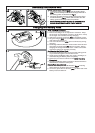
Shaft Assembly (A)
1. Locate the lower shaft (A1) into the upper shaft (A2).
2. Grasp firmly and hold steady the lower shaft. Locate
the upper shaft and snap together firmly.
• The unit is correctly assembled when the gap between
the upper and lower shaft has been closed.
Wheel Assembly (B) & (C)
1. Fix the 2 halves of the wheel together as illustrated in
fig B.
2. Attach the wheel to the trimmer making sure that it is
located into the groove on the trimmer head (C1).
3. Clip the wheel together on the other side, making sure
it is secure.
4. The wheel should turn freely.