


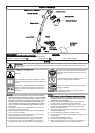

• WARNING
• The use of eye protection is recommended.
Do not lean over the trimmer whilst trimming or edging,
objects may be thrown by the cutting line.
Do not allow cutting head to rest on the ground.
Do not overload your trimmer.
Overloading can be avoided by making sure the motor
speed does not drop unduly.
REMOVE THE BATTERY PACK BEFORE ATTEMPT-
ING ANY MAINTENANCE OR ADJUSTMENT.
• BEFO
RE USE
Make sure that the cutting line is fed out.
• Make sure motor is up to full speed before trimming or
edging.
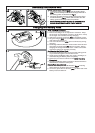
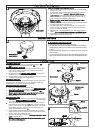
How to trim
1. Hold as illustrated in Fig H.
2. To start, squeeze the safety lock-off (H1) and then the
switch lever (H2).
3. Cut with nylon line at an angle using the tip. See Fig J.
4. Swing trimmer in and out of the cutting area taking
small cuts (K)
5. Line is fed out automatically every time the trimmer
head stops rotating and returns to operating speed.
• Extra line can be fed out manually as described in
Manual line feed
6. To stop your trimmer release the switch lever. The cut-
ting head will stop in approximately one second.
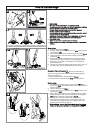
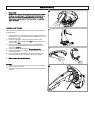
Using the Plant & Tree Guard
The Plant and Tree Guard (L1) allows the trimming of
grass close to plants and trees without damaging them
with the cutting line.
1. Flip the guard down as illustrated in Fig L1.
2. Use the trimmer around trees (L2) and near plants.
How to edge
1. To convert to edging mode, press button (M1) and
twist head (M2).
An audible "click" will confirm that the
head is locked.
2. Hold as illustrated in Fig H.
3. To start, squeeze the safety lock-off (H1) and then the
switch lever (H2).
4. Rest edger on wheel for extra stability and line up the
edge of the lawn with the two indicators on the guard
(N1). Edge in direction indicated in Fig N.
5. To stop your trimmer release the switch lever.
6. To return to trimming mode, press button and twist
head back the opposite way. An audible "click" will
confirm that the head is locked.
• When edging, ensure that the edging wheel is always
resting on the grass (and not on the path/driveway)
J
M
K
How to trim and edge
1
2
H
L1
L2
3
CLICK!
2
1
N
√
x
2