


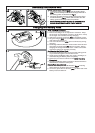
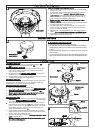

Safety Guard Assembly (D) & (E)
1. Locate the safety guard (D1) over the cutting head
(D2). Ensure the nylon line is fed through the hole in
the safety guard as illustrated in fig D.
2. Push into location and turn safety guard in the direc-
tion illustrated in Fig E, until a click is heard and the
safety guard is securely locked in position.
• ENSURE THE SAFETY GUARD IS SECURELY IN
PLACE BY ATTEMPTING TO TWIST GUARD.
Assembly Instructions cont’
D
E
1
2
CLICK!
G
Charging the Battery Pack
Initial Charging Procedure
1. Use the charger indoors only.
2. Ensure the charger is not exposed to moisture. Keep
the charger and the Battery Pack dry at all times. Keep
the charger well ventilated during charging.
3. Attach the charger connector (F1) to the Battery Pack.
4. Plug the charger (F2) into a suitable household electrical
wall socket and switch on.
5. The red indicator lamp (F3) glows continuously during
charging.
6. Full charge will be achieved in 6 hours after which the indi-
cator lamp on the charger (F3) will turn to green. During
charging the charger becomes warm. This is normal and
means the charger is operating correctly.
Re-Charging the Battery Pack
1. Re-charge the Battery Pack as soon as the cutting power
of your trimmer begins to die and slow down.
2. Avoid running the Battery Pack into "deep" discharge, i.e.
avoid flattening the Battery Pack completely.
3. Follow the procedure outlined in the Initial Charging
Procedure.
4. Charging the Battery Pack according to these instructions
should ensure maximum battery life.
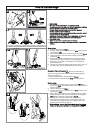
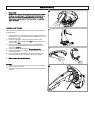
Battery Pack Assembly (G)
1. Attach the Battery Pack as illustrated in Fig G, ensuring
that it clicks into position and is located firmly.
2. To remove, press the two buttons (G1) on either side of the
Battery Pack and slide off.
F
1
2
3
1
1