


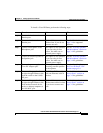


3-9
Cisco IP Phone 7970 Administration Guide for Cisco CallManager 3.3
OL-4314-01
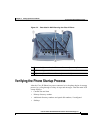
Chapter 3 Setting Up the Cisco IP Phone
Installing the Cisco IP Phone
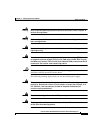
To install a Cisco IP Phone, perform the following steps:
Procedure Notes Reference
Step 1
Connect the handset to the
Handset port.
——
Step 2
Connect a headset to the
Headset port.
Optional. You can add a
headset later if you do not
connect one now.
See the “Headset” section on
page 3-4 for supported
headsets.
Step 3
Connect a microphone to the
Microphone jack.
This option is not available
if you are using in-line
power. You must use an
external power supply.
See the “External Speakers
and Microphone” section on
page 3-4 for guidelines.
Step 4
Connect an external speaker to
the Speaker jack.
This option is not available
if you are using in-line
power. You must use an
external power supply.
See the “External Speakers
and Microphone” section on
page 3-4 for guidelines.
Step 5
Connect the power supply to the
Cisco DC Adapter port.
This step is required if you
are using external speakers
or microphone.
See the “Providing Power to
the Cisco IP Phone 7970”
section on page 2-4.
Step 6
Connect a Category 3 or 5
straight-through Ethernet cable
from the switch to the 10/100
SW port .
Each Cisco IP Phone ships
with one Ethernet cable in
the box.
See the “Network and
Access Ports” section on
page 3-3 for guidelines.
Step 7
Connect a Category 3 or 5
straight-through Ethernet cable
from another network device,
such as a desktop computer, to
the 10/100 PC port.
Optional. You can connect
another network device later
if you do not connect one
now.
See the “Network and
Access Ports” section on
page 3-3 for guidelines.