


Chapter 3 Setting Up the Cisco IP Phone
Adjusting the Placement of the Cisco IP Phone
3-12
Cisco IP Phone 7970 Administration Guide for Cisco CallManager 3.3
OL-4314-01
Mounting the Phone to the Wall
You can mount the Cisco IP Phone on the wall using the footstand as a mounting
bracket or you can use special brackets available in a Cisco IP Phone wall mount
kit. (Wall mount kits must be ordered separately from the phones.) If you attach
the phone to a wall using the standard footstand and not the wall mount kit, you
need to supply the following tools and parts:
• Screwdriver
• Screws to secure the Cisco IP phone to the wall
Use the following procedure to mount the phone on the wall using the standard
footstand. See Figure 3-2 for a graphical overview of this procedure.
Before You Begin
To ensure that the handset attaches securely to a wall-mounted phone, remove the
handset wall hook from the handset rest, rotate the hook 180 degrees, and reinsert
the hook. Turning the hook exposes a lip on which the handset catches when the
phone is vertical. For an illustrated procedure, see Installing the Wall Mount Kit
for the Cisco IP Phone.
Procedure
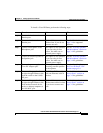
Step 1 Push in the footstand adjustment knob.
Step 2 Adjust the footstand so it is flat against the back of the phone.
Step 3 Insert two screws into a wall stud, matching them to the two screw holes on the
back of the footstand.
The keyholes fit standard phone jack mounts.
Step 4 Hang the phone on the wall.