


3-3
Cisco IP Phone 7970 Administration Guide for Cisco CallManager 3.3
OL-4314-01
Chapter 3 Setting Up the Cisco IP Phone
Before You Begin
In Cisco CallManager, you can add users to the database and associate them with
specific phones. In this way, users gain access to web pages that allow them to
configure items such as call forwarding, speed dialing, and voice messaging
system options. See the “Adding Users to Cisco CallManager” section on
page 5-7 for details.
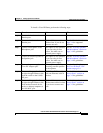
Network and Access Ports
The back of the Cisco IP Phone 7970 has a network port, labeled 10/100 SW, and
an access port, labeled 10/100 PC. Each port supports 10/100 Mbps half- or
full-duplex connections to external devices. You can use either Category 3 or 5
cabling for 10-Mbps connections, but you must use Category 5 for 100 Mbps
connections.
Use the 10/100 SW network port to connect the phone to the network. You must
use a straight-through cable on this port. The phone can also obtain inline power
from a switch over this connection. See the “Providing Power to the
Cisco IP Phone 7970” section on page 2-4 for details.
Use the 10/100 PC access port to connect a network device, such as a computer,
to the phone. You must use a straight-through cable on this port.
Handset
The handset is designed especially for use with a Cisco IP Phone. It includes a
light strip that indicates incoming calls and voice messages waiting.
Speakerphone
By default, the speakerphone is enabled on Cisco IP Phone 7970. You can disable
the speakerphone through the Cisco CallManager Administration application or
from the phone itself.
To disable the speakerphone from Cisco CallManager, choose Device > Phone
and locate the phone you want to modify. In the Phone Configuration web page
for the phone, check the Disable Speakerphone check box.