


3-4
Cisco ATA 187 Analog Telephone Adaptor Administration Guide for SIP (Version 1.0)
OL-21862-01
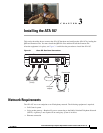
Chapter 3 Installing the ATA 187
Configuring Startup Network Settings
Configuring Startup Network Settings
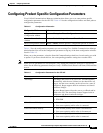
If you are not using DHCP in your network, you must configure these network settings on the ATA 187
after installing the device on the network:
• IP subnet information (subnet mask for IPv4)
• TFTP server IP address
You may also configure these optional settings as necessary:
Administration VLAN ID
Collect this information and see instructions in Chapter 8, “Voice Menu Codes”.
Configuring Security on the ATA 187
The security features protect against several threats, including threats to the identity of the phone and to
data. These features establish and maintain authenticated communication streams between the phone and
the Cisco Unified Communications Manager server, and digitally sign files before they are delivered.
For more information about the security features, see the Cisco Unified Communications Manager
Security Guide.
You can initiate the installation of a Locally Significant Certificate (LSC) from the Security
Configuration menu on the phone. This menu also lets you update or remove an LSC.
Before you begin, make sure that the appropriate Cisco Unified Communications Manager and the CAPF
security configurations are complete:
• On Cisco Unified Communications Operating System Administration, verify that the CAPF
certificate has been installed
• The CAPF is running and configured
See the Cisco Unified Communications Manager Security Guide for more information.
Note If you want to update LSC, you need to use reset to factory default from Chapter 8, “Voice Menu Codes”.