


Installing Your Phone
Installing Your Cisco SPA 301 IP Phone
Cisco Small Business IP Phone SPA 30X User Guide (SPCP) 15
2
Connecting Your Cisco SPA 301 to the Network
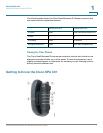
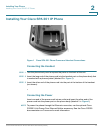
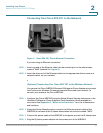
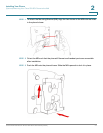
Figure 2 Cisco SPA 301 Phone Ethernet Connection
If you are using an Ethernet connection:
STEP 1 Insert one end of the Ethernet cable into the network port on the phone body
marked “WAN” (labeled 3 in Figure 2).
STEP 2 Insert the other end of the Ethernet cable into the appropriate device, such as a
network switch, on your network.
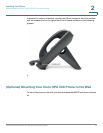
(Optional) Connecting Your Cisco SPA 301 to the Wireless Network
You can use the Cisco WBP54G Wireless-G Bridge for Phone Adapters to connect
the IP phone to a Wireless-G network instead of the wired local network. To
connect your phone to the Cisco WBP54G:
STEP 1 Configure the Cisco WBP54G using the Setup Wizard. See the instructions in the
Wireless-G Bridge for Phone Adapters Quick Installation Guide
, available on
cisco.com. See Appendix A, “Where to Go From Here,” for a list of documents
and locations.
STEP 2 During the Setup Wizard process, connect the Ethernet network cable of the
WBP54G to the back of the IP phone base station into the slot marked “WAN.”
STEP 3 Connect the power cable of the WBP54G to the power port on the IP phone base.
STEP 4 Plug the IP phone power adapter into the power port of the WBP54G.