4 TALKSWITCH START GUIDE
STEP 2 — CONNECT TALKSWITCH TO YOUR PC OR NETWORK
TalkSwitch can be set up anywhere in the vicinity of your incoming phone lines
and computing equipment.
• TalkSwitch 48-CA, 48-CVA and VS models can be connected to your PC using
a Local Area Network (LAN) or USB connection. CA models also offer an
RS-232 connection.
• The TalkSwitch 24-CA can be connected to your PC using a USB or serial
connection.
If you’re installing a TalkSwitch system with multiple TalkSwitch units or you’re
adding a TalkSwitch unit to an existing system, refer to the Networking TalkSwitch
on a LAN section on page 13.
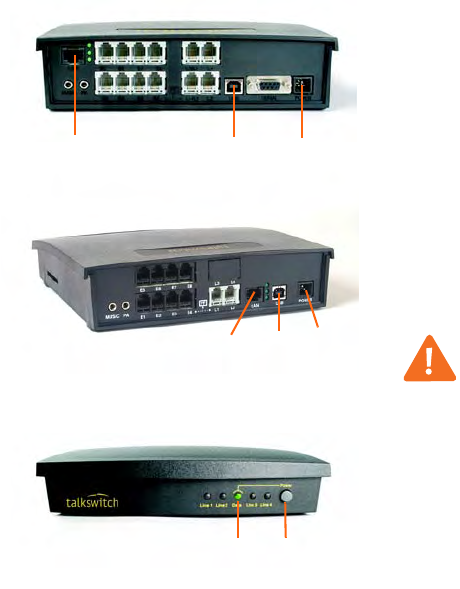
Connection Options
Connect using LAN (Ethernet): Connect one end of
the provided RJ-45 Ethernet cable to the LAN port at
the back of the TalkSwitch unit and the other end
directly to your Ethernet switch. Ensure your computer
is connected to the same switch.
Connect using USB: Using a USB A-to-B cable, connect
the B end to the USB port at the back of TalkSwitch,
and the A end to the USB port of your PC.
Power up TalkSwitch
1. Connect the provided AC adapter to the Power port
at the back of the TalkSwitch unit and plug the
adapter into an available power outlet.
Warning! Never use a power adapter other than
the one provided with TalkSwitch.
2. Turn TalkSwitch on by pressing the Power button
on the front of the unit. The lights on the front
panel will flash for a few moments during boot-up,
then stop. The center light marked Data will remain
lit, indicating that the TalkSwitch unit is on.
LAN
USB
Power
TalkSwitch CA and CVA models
TalkSwitch VS models
USB
Power
LAN
Data
Power


