


Server Administration
48 Avaya one-X™ Deskphone Value Edition 1600 Series IP Telephones Administrator Guide Release 1.0
16. Under Lease duration for DHCP clients, select Unlimited and then click the OK button.
!
CAUTION:
CAUTION: IP address leases are kept active for varying periods of time. To avoid having
calls terminated suddenly, make the lease duration unlimited.
Adding DHCP Options
Use the following procedure to add DHCP options to the scope you created in the previous
procedure.
1. On the DHCP window, right-click the Scope Options folder under the scope you created in
the last procedure.
A drop-down menu displays.
2. In the left pane of the DHCP window, right click the DHCP Server name, then click Set
Predefined Options....
3. Under Predefined Options and Values, click Add.
4. In the Option Type Name field, enter any appropriate name, for example, “Avaya IP
Telephones.”
5. Change the Data Type to String.
6. In the Code field, enter 242, then click the OK button twice.
The Predefined Options and Values dialog box closes, leaving the DHCP dialog box
enabled.
7. Expand the newly created scope to reveal its Scope Options.
8. Click Scope Options and select Action-->Configure Options from the menu.
9. In the General tab page, under the Available Options, check the Option 242 checkbox.
10. In the Data Entry box, enter the DHCP IP telephone option string as described in
DHCP Generic Setup
on page 38.
Note:
Note: You can enter the text string directly on the right side of the Data Entry box under
the ASCII label.
11. From the list in Available Options, check option 003 Router.
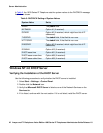
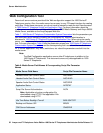
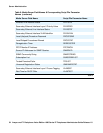
12. Enter the gateway (router) IP Address from the IP address field of Table 3: Required
Network Information Before Installation - Per DHCP Server.
13. Click the Add button.
14. Click the OK button.