Transmitter Setup (Continued)
UniPak Transmitter Input Connection
Connect an audio input device (micr
ophone or guitar cable)
to the audio input jack on the bottom of the transmitter. A
number of Audio-Technica professional microphones and cables
are available separately, pre-terminated with a UniPak input
connector (see “Optional System Accessories” on page 28).
The cable connector latches automatically when inserted into
the transmitter jack. To unlatch and remove the connector,
simply pull up on the connector’s knurled metal collar.
UniPak Transmitter Antenna
The AEW-T1000 transmitter includes two field-replaceable
antennas. A flexible-wire antenna is supplied mounted on the
transmitter, while a separate short, helical antenna is supplied
with the accessories. Either antenna simply screws into the
transmitter’s antenna fitting. Check the installed antenna
occasionally to make certain it is snugly attached (only finger-
tight). The helical antenna is more convenient physically but
may not have the operating range of the wire antenna. The
wire antenna should hang down, at its full length, from the
bottom of the transmitter. If the received signal is marginal,
experiment with different transmitter positions on your body
or instrument; try the wire antenna; or try repositioning the
receiver.
Do not attempt to modify either transmitting
antenna. Replace them only with the same parts
, available
from the Audio-Technica Service Department.
Handheld Transmitter Antenna
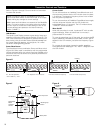
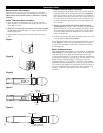
The antenna for the handheld mic/transmitter is in the black,
non-metallic section at the bottom of the unit (see Figure K on
page 18). For best results, hold the mic/transmitter naturally,
around its painted metal case. Holding or otherwise covering
the antenna housing may reduce operating range.
UniPak Transmitter Mounting Clip
The UniPak transmitter’s mounting clip may be installed with
the case positioned either “up” or “down,” depending upon
which is preferred for the particular application. To turn the clip
around, spring the ends of the clip out of the two holes on the
sides of the transmitter case (see Figur
e J on page 18) and
r
einstall it facing in the opposite direction.
23


