


3
Model 480i SIP Admin Guide
480i IP Phone Set up
The 480i’s Options List
1.
Press the
£
button on the
phone to enter the options list
2.
Use the
r
and
s
to scroll
through the list of options
3.
Press the
Show
softkey, the
4
button or press the number
corresponding to the option to
select an option
4.
Use the softkeys to change a
selected option
5.
Press the
Done
softkey at any
time to save the change and exit
the current option
6.
Press the
Cancel
softkey, the
3
button or the
k
button at
any time to exit without saving
the changes
Administrator Level Options
Some options in the phone’s
options list are considered
administrator level options and
require the administrator user
name and password. When
attempting to access administrator
level options, the phone will
prompt for the administrator
password before allowing access.
The default password for the
administrator is “22222”. For all
other phone options, please refer
to the
Aastra 480i Installation Guide
.
The administrator level options in
the phone’s Options List are:
•“
8.Network
”
•“
9.SIP Settings
”
•“
4.Factory Default
” found
under option “
10.Phone Status
”
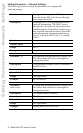
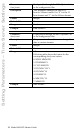
Network:
If DHCP is enabled, all the
Network settings are automatically
conÞgured. The 480i’s Þrmware
allows the network settings to be
manually entered, if for any reason
the phone cannot populate any of
the settings with DHCP enabled.
If DHCP is disabled the following
network settings can be conÞgured
manually:
1. DHCP
This turns DHCP on or
off. IP Address, Subnet Mask
and Gateway options are
automatically populated and
are read-only when DHCP is
used. DHCP is used by default.
2. IP Address
This is the phone’s IP address.
To assign a static IP address to the
phone, disable DHCP.
3. Subnet Mask
To assign your own subnet mask
to the phone, disable DHCP.
4. Gateway
To assign your own gateway IP
address, disable DHCP.
5. DNS
To assign your own DNS
addresses, disable DHCP.
6. TFTP Server
This is the TFTP server’s IP
address.