


9
Installation
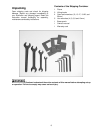
Tools required for installation
wrench set (provided)
level
forklift or crane with straps
1. Remove the crate from around the planer
and any fasteners securing the planer to the
skid.
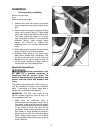
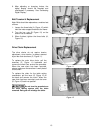
2. Remove the side covers and place the lifting
hooks into the slots (Figure 1). Place straps
under them and lift the machine off the skid.
The planer should be located on a sturdy
floor, preferably concrete, in a dry area with
sufficient lighting. Leave enough space
around the machine for loading and
offloading stock and routine maintenance
work.
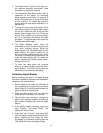
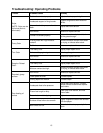
3. When the planer is situated, use the leveling
screws (Figure 2) to level the machine.
4. Exposed metal areas of the planer have
been factory coated with a protectant. This
should be removed with a soft cloth and
kerosene. Do not use an abrasive pad. Do
not let solvent contact the plastic parts of
the machine, as it may damage them.
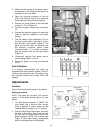
Electrical Connections
Electrical connections must
be made by a qualified electrician in
compliance with all relevant codes. The
machine must be properly grounded to help
prevent electrical shock and possible fatal
injury.
The planer may be fitted with a 230 volt plug, or
may be “hard-wired” directly to your electrical
panel. If hard-wired to a panel, make sure a
disconnect is available for the operator.
IMPORTANT: The 230 volt model of the
WP2412 planer is wired for 230 volt only; it is
not convertible to 460 volt.
1. Make sure the machine’s plug is
disconnected from the power source. If it is
hard-wired, make sure the fuses have been
removed or the breakers have been tripped
in the circuit to which the saw will be
connected. Place a warning placard on the
fuse holder or circuit breaker to prevent it
being turned on while the machine is being
wired. Always follow proper Lock Out/Tag
Out procedures when performing any wiring
on this machine.
Figure 1
Figure 2