


IB-PH559(9803F)-WM-E-090103
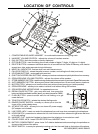
LOCATION OF CONTROLS
1. COMFORTABLE ROUNDED HANDSET - for comfortable use even during long calls.
2. HANDSET VOLUME CONTROL - adjusts the volume of handset receiver.
3. DIAL BUTTON - dials the number currently displayed.
4. OPTION BUTTON - used for dialing the correct number of digits (7-digits, 10-digits or 11-digits).
5. DELETE BUTTON - erases an individual record or all records from the Caller ID Memory, also used to
accept time, date, and area code during initial setup.
6. NEW CALL INDICATOR - flashes when new calls have come in.
7. CALLER ID DISPLAY - shows the callers name, number, and calling time & date (and more).
8. UP/DOWN BUTTONS - reviews all calls received.
9. ONE-TOUCH SPEED DIAL BUTTONS - allows you to store numbers and quickly dial them from memory.
10. SPEAKERPHONE VOLUME CONTROL - adjusts the volume of the speaker.
11. STORE (MEMORY) BUTTON - used for storing numbers into the one-touch or two-touch Speed Dial memories.
12. AUTO (MEMORY) BUTTON - allows you to store & dial numbers from 10 two-touch memory locations.
13. MUTE BUTTON - allows you to hear the other party without them hearing you (while pressed).
14. SPEAKERPHONE - allows you to make or receive a call without lifting the handset.
15. SPEAKERPHONE MICROPHONE - for speakerphone use.
4
15
18
17
16
24
21
19
16. REDIAL/PAUSE BUTTON - get a new dial tone, then press this
button to dial the last dialed number (also if you need a pause for PABX).
17. FLASH BUTTON - press to switch calls for call waiting or to get
a new dial tone.
18. TONE/PULSE SWITCH - selects the desired dialing mode.
19. RINGER ON/OFF SWITCH - normally on, allows you to turn the
ringer off for undisturbed privacy.
20. AC ADAPTOR JACK - allows you to use home AC power supply
(AC adaptor not included).
4
5
1
3
6
7
8
11
14
13
10
2
12
9
25
26
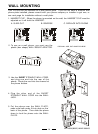
BACK OF THE PHONE
22
23
21. LINE CORD JACK - insert one end of the telephone line cord here when connecting the telephone.
22. HOOK SWITCH - press down to release the line, hold it down and then release it to get a new dial tone
or for call waiting.
23. HANDSET CLIP - holds the Handset in place when the telephone is mounted on a wall.
24. COILED CORD JACK - Insert COILED CORD from HANDSET here.
25. BATTERY COMPARTMENT - place 4 size AA alkaline batteries inside according to the polarities as
shown on the bottom of the phone.
26. RESET SWITCH - to reset your phone by inserting a pin into the small hole on the bottom of the phone.
20