


Grandstream Networks, Inc. HT-502 User Manual Page 6 of 32
Firmware 1.0.0.77 Last Updated: 1/2008
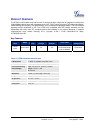
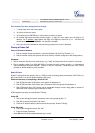
TABLE 2: DEFINITIONS OF THE HT502 LEDS
Power LED
Indicates Power. Remains ON when Power is connected and turned ON.
WAN LED
Indicates LAN (or WAN) port activity.
LAN LED
Indicates PC (or LAN) port activity.
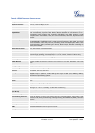
PHONE1 / PHONE2
LED
Indicate status of the respective FXS Ports-PHONE1 / PHONE2 on the back
panel
Busy – ON (Solid Green)
Available – OFF
Slow blinking FXS LEDs indicates voicemail for that port.
NOTE: All LEDs display green when ON. Slow blinking of WAN and LAN LED together indicate the
product in firmware upgrading or provision stat
e
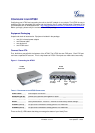
Configure Your ATA
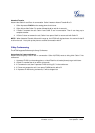
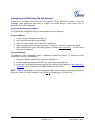
The HT502 is easy to configure using the embedded GUI pages and the following five (5) steps.
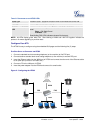
FIVE EASY STEPS TO CONFIGURE THE HT502
1. Connect a standard touch-tone analog telephone (or fax machine) to first FXS port.
2. Connect another standard touch-tone analog telephone (or fax machine) to second FXS port.
3. Insert the Ethernet cable into the WAN port of HT502 and connect the other end of the Ethernet cable
to an uplink port (a router or a modem, etc.)
4. Connect a PC to the LAN port of HT502.
5. Insert the power adapter into the HT502 and connect it to a wall outlet.
Figure 2: Configuring the HT502
z
Internet
ADSL/Cable
Modem Ethernet
WAN
LAN
FXS
Fax
Cordless
Phone
Analog Phone
FXS
Fax
Cordless
Phone
Analog Phone