


HandyTone-386 User Manual Grandstream Networks, Inc.
21
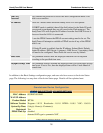
SIP User ID
SIP service subscriber’s User ID
Authenticate ID
SIP service subscriber’s Authenticate ID. Can be identical to or different from
SIP User ID
Authenticate
Password
SIP service subscriber’s account password
Name
SIP service subscriber’s name which will be used for Caller ID display
Register Expiration
This parameter allows the user to specify the time frequency (in minutes) the
HandyTone ATA refreshes its registration with the specified registrar. The
default interval is 60 minutes (or 1 hour). The maximum interval is 65535
minutes (about 45 days).
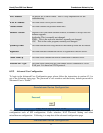
Local SIP port
This parameter defines the local SIP port the HandyTone ATA will listen and
transmit. The default value for FXS port 1 is 5060. The default value for FXS
port 2 is 5062.
Local RTP port
This parameter defines the local RTP-RTCP port pair the HandyTone ATA will
listen and transmit. It is the base RTP port for channel 0. When configured,
channel 0 will use this port _value for RTP and the port_value+1 for its RTCP;
channel 1 will use port_value+2 for RTP and port_value+3 for its RTCP. The
default value for FXS port 1 is 5004. The default value for FXS port 2 is 5008.
Enable Call
Features
Default is No. If set to Yes, Call Forwarding & Do-Not-Disturb are supported
locally
Send DTMF
This parameter controls how DTMF events are transmitted. There are 3 ways:
in audio which means DTMF is combined in audio signal (not very reliable
with low-bit-rate codec), via RTP (RFC2833), or via SIP INFO.
DTMF Payload
Type
This parameter sets the payload type for DTMF using RFC2833
Preferred Vocoder
The HandyTone ATA supports up to 7 different Vocoder types including G.711
A-/U-law,G.723.1, G.726, G.728, G.729A/B, iLBC. Depending on the
product model, some of these Vocoders may not be provided in standard
release.
Users can configure Vocoders in a preference list that will be included with the
same preference order in SDP message. The first Vocoder in this list can be
entered by choosing the appropriate option in “Choice 1”. Similarly, the last
Vocoder in this list can be entered by choosing the appropriate option in
“Choice 7”.