


10
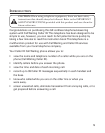
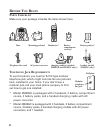
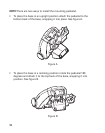
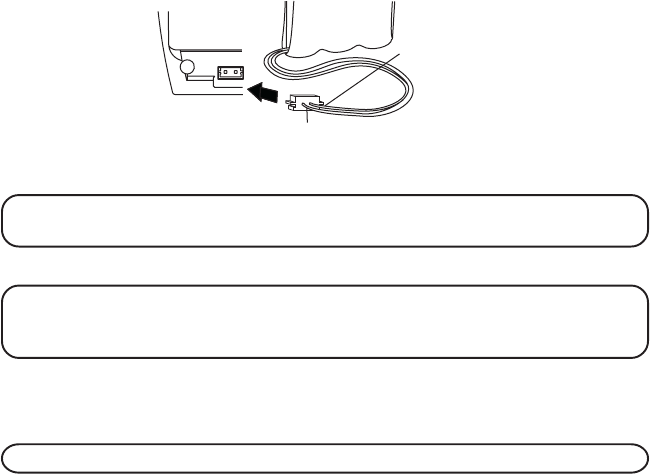
• Lift the battery pack and connect it's plug to the jack inside
the compartment.
NOTE: It is important to maintain the polarity (black and red wires) to the
jack inside the compartment as shown in the illustration.
• Slide the battery compartment cover back into place.
NOTE: If the handset battery is not installed or the battery pack is not
properly connected inside the battery compartment, the handset displays “NO
BATTERY” when the handset is placed in the base cradle.
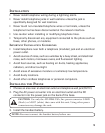
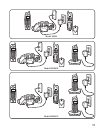
4. Connect the telephone line cord by plugging one end of the telephone
line cord into the jack on the back of the base marked TEL LINE and
other end into a telephone wall jack.
NOTE: One base can support up to four handsets.
5. If you purchased model 25825, place the handset in the base cradle.
The charge indicator turns on to indicate the battery is charging.
If you purchased model 25826GE, place one handset in the base cradle,
then plug the charging cradle into an electrical outlet, and place the
other handset in the cradle. The charge indicators turn on to indicate
the battery is charging.
If you purchased model 25826GC, place one handset in the base cradle,
then plug both charging cradles into an electrical outlet, and place a
handset in each cradle. The charge indicators turn on to indicate the
battery is charging.
6. Allow the handset(s) to charge on a flat surface, such as a desk or table
top, for 16 hours prior to first use. If you don't properly charge the
phone, battery performance is compromised.
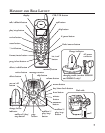
BLACK WIRE
RED WIRE
BATTERY
PRESS DOWN
FIRMLY