


6
Installation Steps
Installation of your ClearSounds™ CSC40 Phone is easy. There are some basic steps you
need to take when you set-up your CSC40 for the first time.
Check Parts list.
• Install (4) AAA Alkaline batteries (not included). Batteries are required if you wish to
increase the ringer level an additional 10 dB.
• Set the dialing mode.
• Choose desktop or wall mount.
• Program your memory dial buttons.
• Set ringer.
• Set your volume and tone.
PARTS CHECK LIST
Check to make sure your package includes the items described below. You should have
a TELEPHONE BASE, TELEPHONE HANDSET, 6ft LONG TELEPHONE LINE CORD,
8 inch SHORT TELEPHONE LINE CORD, HANDSET CURLY CORD, WALL PLATE
ADAPTER, HEEL PLATE AND OWNERS MANUAL
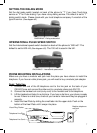
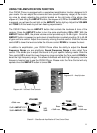
INSTALLING THE OPTIONAL BATTERIES
(required if you wish to increase the ringer level up to 85 dB)
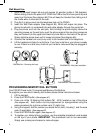
1. Open the battery compartment door located on the bottom of your phone by pulling
back the latch.
2. Insert correctly (4) AAA alkaline batteries
(not included) in the battery compartment
(See diagram #1). Be sure to observe battery
polarity as imprinted on the base of the
compartment.
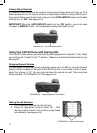
3. Snap the battery compartment door back in
place.
4. The batteries will last approximately 1 year
before needing replacement.
5. Note: The telephone ringer will operate with
or without batteries.
6. Note: When replacing batteries, you will
need to remove the Wall Plate adapter if
in use. Slide the phone upward to remove
& disconnect the phone from your existing
wall jack. Slowly slide the Wall Plate adapter
down until it unsnaps from the phone.
Follow the directions above.
DIAGRAM #1- Installing the batteries