2-9
Cisco Unified IP Phone Administration Guide for Cisco Unified CallManager 5.0 (SCCP), Cisco Unified IP Phones
OL-8148-01
Chapter 2 Preparing to Install the Cisco Unified IP Phone on Your Network
Understanding the Phone Startup Process
Understanding the Phone Startup Process
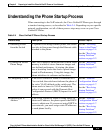
When connecting to the VoIP network, the Cisco Unified IP Phone goes through
a standard startup process, as described in Table 2-4. Depending on your specific
network configuration, not all of these process steps may occur on your Cisco
Unified IP Phone.
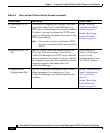
Table 2-4 Cisco Unified IP Phone Startup Process
Process Step Description Related Topics
1. Obtaining Power
from the Switch
If a phone is not using external power, the switch
provides in-line power through the Ethernet cable
attached to the phone.
See the “Providing
Power to the Phone”
section on page 2-4.
See the “Resolving
Startup Problems”
section on page 9-2.
2. Loading the Stored
Phone Image
The Cisco Unified IP Phone has non-volatile Flash
memory in which it stores firmware images and
user-defined preferences. At startup, the phone
runs a bootstrap loader that loads a phone image
stored in Flash memory. Using this image, the
phone initializes its software and hardware.
See the “Resolving
Startup Problems”
section on page 9-2.
3. Configuring VLAN If the Cisco Unified IP Phone is connected to a
Cisco switch, the switch next informs the phone of
the voice VLAN defined on the switch port. The
phone needs to know its VLAN membership
before it can proceed with the Dynamic Host
Configuration Protocol (DHCP) request for an IP
address.
See the “Network
Configuration Menu”
section on page 4-7.
See the “Resolving
Startup Problems”
section on page 9-2.
4. Obtaining an IP
Address
If the Cisco Unified IP Phone is using DHCP to
obtain an IP address, the phone queries the DHCP
server to obtain one. If you are not using DHCP in
your network, you must assign static IP addresses
to each phone locally.
See the “Network
Configuration Menu”
section on page 4-7.
See the “Resolving
Startup Problems”
section on page 9-2.


