


Creating the DHCP Scope: Adding the 4602 IP Telephone Option (176): - Page 15
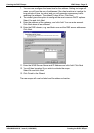
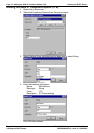
5. In the string value field enter the following:
MCIPADD=xxx.xxx.xxx.xxx,MCPORT=1719,TFTPSRVR=yyy.yyy.yyy
.yyy,TFTPDIR=z Where:
xxx.xxx.xxx.xxx = IP of the INDeX/IPNC
yyy.yyy.yyy.yyy = TFTP Server IP Address (of the PC running the
INDeX/IPNC Manager application)
z = the directory the files are located in. If you are unsure of the location,
leave this blank. The PC will look in the default folder of the INDeX/IPNC
Manager directory for the required .bin files.
6. Click OK.
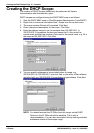
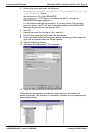
7. Expand the server by clicking on the + next to it.
8. Left click the scope you just created for the phones.
9. In the right hand portion of the screen, where the settings of the scope are,
right click the mouse button on Scope Options.
10. Select Configuring Options.
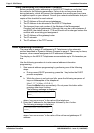
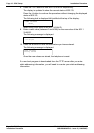
11. Scoll down and make sure 176 is checked:
12. Verify the String value is correct and click OK.
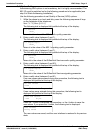
The scope can be manually activated by right clicking on the scope and
selecting Activate. The activation is immediate. Likewise you can deactivate by
selecting deactivate
INDeX 4602 IP Telephone Installation Manual Page 15
38DHB0002UKCQ – Issue 2 (11/06/2003) Creating the DHCP Scope: