22
bottom of the telephone housing.
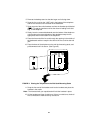
1. Turn the telephone face down on a flat surface.
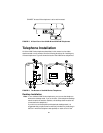
2. Remove the desktop stand (the upper tabs on the stand are shown as
2 in Figure 6; the lower tabs are shown as 7 in Figure 6). If you are
using a 6416D+M or 6424D+M telephone and want to install the
adjunct module, do so now before proceeding with the following steps.
For more information on the installation of the module, see the
documentation that came in the box with the module.
3. Snap one end of the line cord (D2R or D8W) into the “LINE” jack (3 in
Figure 6) on the bottom of the telephone.
4. If you are installing a 6416D+ or 6416D+M or a 6424D+ or 6424D+M
with a connected expansion module, snap one end of the expansion
module cord into the “XM24” jack (4 in Figure 6).
5. Thread the line cord (and expansion module cord, if appropriate)
through the routing channel leading to the top of the desktop stand
(1 in Figure 6). Make sure that each cord is placed securely under the
square tabs in the routing channel.
6. Snap one end of the coiled handset cord into the Handset jack (6 in
Figure 6). This jack is labeled . Thread the handset cord into the
channel leading to the side edge of the telephone).
7. Turn the telephone right side up, with the front facing you.
8. Snap the free end of the handset cord into the handset and place the
handset in the cradle.
9. If appropriate, snap the free end of the expansion module cord into the
TEL SET jack on the expansion module.
10. Snap the free end of the line cord into the modular wall jack.
11. Lift the handset and listen for dial tone. If there is no dial tone, check all
wire connections to make sure they are secure.
Note: If you are using a headset with the telephone, you can connect it to the
Handset jack (6 in Figure 6) or the Headset jack on some telephones
(5 in Figure 6).
Wall Installation
Note: For wall-mounting, you will need a 1-foot line cord. (This cord is
not
supplied with the telephone, but can be ordered by using this
comcode: 103786760.)
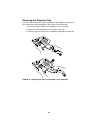
If you are wall-mounting the telephone, you should remove the
tray from the base of the telephone. For this purpose, use the
instructions listed under “Removing the Telephone Tray” later in this
guide.
1. Make sure the 8-conductor wall mount plate is in place.
2. Do the following to reverse the handset hook. (a in Figure 7 shows the
handset retainer located under the handset.)
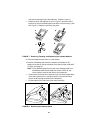
— In order to release the handset retainer hook, press down on the hook


