Installing your Avaya 1230 IP Deskphone
40
Connecting the PC Ethernet cable
Connect the CAT5e PC Ethernet cable between your IP Deskphone and
your computer to enable your computer to access the LAN.
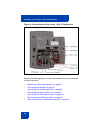
1. Plug one end of the PC Ethernet cable (not supplied) into the PC
Ethernet port on the back of your IP Deskphone marked with the
(
symbol.
2. Thread the cable through the channel in the foot stand.
3. Connect the other end of the cable to the LAN port on your computer.
Wall-mounting the IP Deskphone (optional)
You can install your Avaya 1230 IP Deskphone on a wall. Wall-mount the
IP Deskphone using the two keyholes on the back of the IP Deskphone.
You do not need the foot stand for wall-mounted applications.
1. Remove the foot stand.
2. Ensure all cables are properly routed and the Avaya 1230 IP
Deskphone is functioning.
3. Make small marks on the wall where you want to align each keyhole
slot.
4. Insert the screws (not provided) so that they protrude slightly from the
wall.
5. Align the keyholes on the back of the Avaya 1230 IP Deskphone with
the screws in the wall.
6. Slide the IP Deskphone onto the screws to secure the Avaya 1230 IP
Deskphone in position.


