110
Save/Load of Song data
Flashing
7
After selecting the track(s), press the [ENTER/YES]
key.
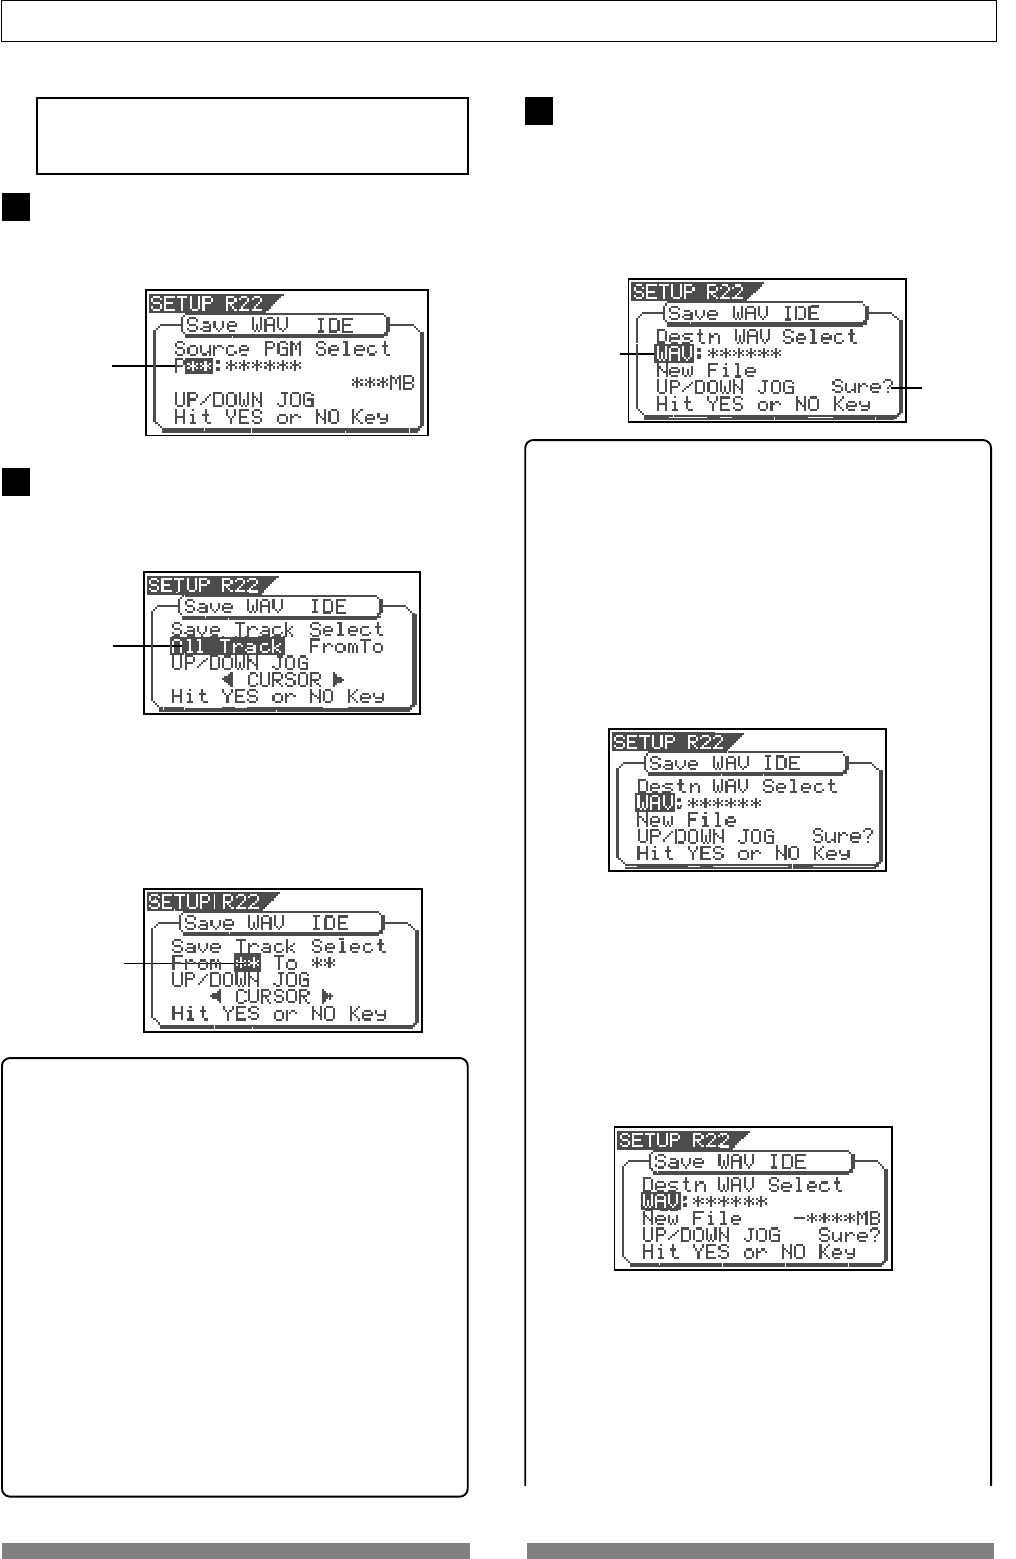
The display shows the screen for selecting a WAV file
on the disk.
If no file is recorded on the disk, "WAV" and "Sure?"
flashes. You can select "Eject" by rotating the [JOG]
dial. To remove the disk, select "Eject" and press the
[ENTER/YES] key.
<Hints>
If the backup disk contains any existing program(s)
previously saved, the display may show following
screens after carrying out the previous step, depending
on the available space of the backup disk.
•Showing the title and "New File":
There is enough space for creating a new WAV file in
addition to the existing WAV files on the disk.
Pressing the [ENTER/YES] key advances to the next step
(for editing the file name).
After completing the save operation, this new WAV file
will be added on the disk.
•Showing the title and "New File", and "-****MB"
alternately:
The space for adding a new WAV file to the existing
WAV files on the disk is ****MB short.
Pressing the [ENTER/YES] key shows "Disk Full!",
followed by "Delete All WAV?".
Pressing the [ENTER/YES] key again deletes all the WAV
file on the disk and advances to the next step (for
editing the file name)
After completing the save operation, only this new WAV
file will remain on the disk.
•Showing the title and "****MB":
To get enough space for creating a WAV file, the
specified file on the backup disk will be deleted.
By pressing the [ENTER/YES] key, "DEL" appears.
Pressing the [ENTER/YES] key again will delete the
specified WAV file on the disk and advances to the
next step (for editing the file name).
After completing the save operation, the specified WAV
file will be replaced with the new WAV file on the disk.
Flashing
Flashing
Flashing
While "Off" is blinking, press the [ENTER/YES] key.
The display shows the screen for selecting a program
to be saved. The program number currently selected
flashes, while the data size of the program is shown.
Use the [JOG] dial to select a program to be saved
and press the [ENTER/YES] key.
The display shows the screen for selecting a track to
be saved. Initially, "All Track" flashes.
By rotating the [JOG] dial (or press the [CURSOR] </>
key), you can select "From ** To **" (where the left field
flashes initially) instead of "All Track".
If you save data for all tracks (1 through 24), select
"All Track". If you save data for any specific track(s),
select "From ** To **" and specify the desired track
numbers.
<To specify the desired tracks to "From ** To **">
By rotating the [JOG] dial while the left ("From") field
is flashing, you can select the track number from 01
through 24. The number in the right ("To") field
automatically follows the number in the left field (i.e.
numbers in the left and right fields are always the same).
Therefore, if you want to save a single track, you just
have to set the right ("From") field and do not have to
set the right ("To") field. For example, "From 02 To 02"
will save only track 2.
To specify tracks 5 through 12:
•Enter "05" to the left field while the left field is
flashing.
•Press the [CURSOR </>] key to make the right field
flashing.
•Enter "12". (Note that the number for the right field
must be equal to or larger than the left field.)
Finally the screen shows "From 05 to 12" to save tracks
5 through 12.
5
6
<Note>
If you save all data from "ABS 0" to "REC END", make
sure to set the Edit Source Export function to Off.
Flashing
