


3
B. Install the rechargeable battery pack into the handset
The handset is powered by a rechargeable battery pack. The battery recharges
automatically when the handset is placed in the base unit .
NOTE: If your home has specially wired alarm equipment
connected to the telephone line, be sure that
installing the system does not disable your alarm
equipment. If you have questions about what will
disable your alarm equipment, contact your
telephone company or a qualified installer.
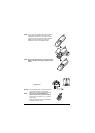
1) Press down on the handset battery case cover (use the
finger indention for a better grip) and slide the cover
downward to remove.
2) Plug the battery pack connector (red & black wires) into
the jack inside the battery compartment (the connector
notches fit into the groo ves of the jack only one way).
Match the wire colors to the polarity label in the battery
compartment, connect the battery and listen for a click to
insure connection.
3) Before replacing the battery cover, pull on the battery
wires slightly. If the connection is secure, the jack will
stay in place. Then place the bat tery case cover back on
the handset by sliding it upwards until it clicks into place.
NOTE: For optimum performance, use only the Uniden
Battery (BT-905 or BT-1006) supplied with your
phone.
Talk and Standby Times
With average use, your handset battery provides
approximately 6 hours of t alk time and ap proximately 7 da ys
of standby time. When your handse t is not being used and is
left off of the charging cradle, the battery will gradually
discharge. You can achieve optimum battery life and
performance by retur ning th e handset to the charg ing cr adle
after each use. If the handset is left of f of the chargin g cradle, the actual talk time durati on will
be reduced respective to the amount of time the handset is off of the charging cradle.
C. Connect the base unit and charge the handset
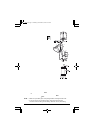
1) Connect the AC adapte r to t he DC IN 9V jack and a
standard 120V AC wall outlet.
2) Set the base unit on a desk or tabletop, and place
the handset in the base unit with the keypad facing
forward.
3) Make sure the charge/in use LED illuminates.
If the LED does not illu minate, check to see t hat t he
AC adapter is plugged in and the handse t makes
good contact with the base charging contacts.
NOTICE: Do not place the power cord where it creates
a trip hazard or where it could become
chafed and create a fire or electrical hazard.
NOTE: • Use only the supplied AD-0001 AC
adapter. Do not use any other AC adapter.
• Connect the AC adapter to a continuous
power supply.
• Place the base unit close to the AC outlet to
avoid long extension cords.