


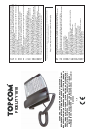


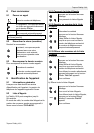

4 Topcom Fidelity 1010
Topcom Fidelity 1010
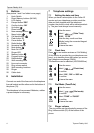
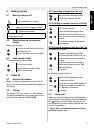
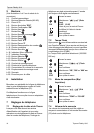
5 Buttons
(See picture 1 and 2 on folded cover page)
1. Hook Switch
2. Direct Memory buttons (M1-M3)
3. LCD display
4. Escape button ‘ESC’
5. Confirm button ‘OK’
6. Up button ‘ ’
7. Down button ‘ ’
8. New message button
9. Menu button ‘ ’
10. Call back button ‘ ’
11. Flash button ’R’
12. Pauze button ‘P’
13. Redial button ‘ ’
14. Numerical keypad
15. Mute button ‘ ’
16. Mute On LED
17. Ringer LED
18. Memory button
19. Program button
20. Delete button ‘ ’
21. Wall mounting hook
22. Line cord connector
23. Ring volume switch
24. Wall mounting locations
25. Ringer
26. Cable slots
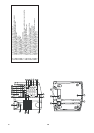
6 Installation
Connect one end of the line cord to the telephone
line wall socket and the other end to the bottom of
the phone (23).
This telephone is line powered. Batteries, neither
a power adapter is necessary.
7 Telephone settings
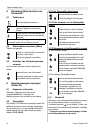
7.1 Setting the date and time
When you have a subscription to the Caller ID
service and your telephone provider sends the
date and time together with the telephone
number, the phone’s clock will be set automatical-
ly. The year must always be set manually.
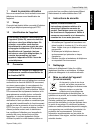
7.2 Flash time
Press to use certain services as ‘Call Waiting’
(if this service is provided by your telephone com-
pany); or to transfer phone calls when you are us-
ing a telephone exchange (PABX).
The flash time can be selected (100/300/600ms).
7.3 Dial Mode (Tone/Puls)
7.4 Ringer volume
The ring volume can be adjusted by means of the
Ring Volume switch (23) at the bottom of the
phone.
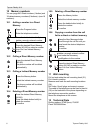
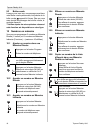
Enter the menu
Select ‘ ’(Date Time)
OK ‘01-05 12-26’
Enter the day, month and time
(4digits) using the numerical keypad
OK To confirm
ESC To leave the menu
Enter the menu
Select ‘ ’(Flash time)
OK To confirm
Select ‘100’, ‘300’ or ‘600’ ms
OK To confirm
ESC To leave the menu
Enter the menu
Select ‘ ’(Dial mode)
OK To confirm
Select ‘TONE’ or ‘PULSE’
OK To confirm
ESC To leave the menu
R