(or for at least 12 hours) without interruption before the first use.
To charge the battery, place the handset, keypad down, in the base unit. Ensure that the
“CHARGE” LED on the base illuminates. If the LED does not light, check the following:
1) Ensure that the AC adapter is plugged into a working, unswitched AC outlet, and that
the RJ-45 cord is plugged into both the telephone and the AC adapter in the phone
position.
2) Ensure that the contacts on the bottom of the handset are making good contact with
the base unit charging contacts.
CLEANING THE BATTERY CONTACTS
To maintain the handset in fully-charged condition, it is important to clean all charging con-
tacts on the handset and base unit. Use a pencil eraser or other contact cleaner. Do not use
any liquids or solvents to clean these contacts.
ADJUSTING THE BASE RING VOLUME
To adjust the ringer volume of the base unit, locate the respective “Line Ringing Volume”
adjustment control on the back of the telephone labeled “RINGER LOW/HI.” Slide the
switch to the desired setting.
ADJUSTING THE HANDSET RING VOLUME
The handset ring volume can be adjusted by pressing the volume “UP” and “DOWN” keys
on the handset during the ringing or idle mode.
ADJUSTING
SPEAKERPHONE VOLUME
To adjust the speakerphone volume, press the volume “UP” and “DOWN” keys on the base
unit. Press volume “UP” key to increase the volume level. Press the volume “DOWN” key
to decrease volume level.
ADJUSTING H
ANDSET RECEIVE
VOLUME
To adjust the handset receiver volume, press volume “UP” and “DOWN” keys on the hand-
set while the handset is on line. Volume control is also available during mute.
LIGHTED K
EYPAD
The keypad on the handset will illuminate if one of the keys is pressed. It will turn off after
a few seconds. If the “ON” key is pressed, the keypad will illuminate and then go off after
a few seconds, except the “ON” key. This is to indicate that the phone handset is on. The
light will turn off when the “OFF” key is pressed.
LOW
BATTERY
INDICATOR
When the handset battery level is low, the LED indicator will blink when the phone is not
in use. When the phone is in use, the LED will blink and the handset will emit a beep tone.
Return the handset to the base cradle for recharging as soon as is practical.
PROGRAMMING THE HOTEL SERVICES DIRECT ACCESS KEYS
The CL2100 series has either five (model CL2105) or ten (model CL2110) programmable
hotel services direct access (or auto dial) keys (M1-M5/M10.) These keys can be
programmed to automatically dial telephone numbers or activate telephone system features.
These keys can only be programmed from the base unit. To program the keys, follow these
steps:
1) Connect the CL2100 series to a working telephone line.
2) Press the either “Line 1” or “Line 2” key on base unit. The LED for the line selected
will illuminate, indicating its selection.
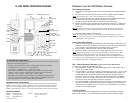
3) Press the “STORE” key. (This is a hidden key; for key location, please refer to the
diagram on the inside front cover of this user guide.)
4) Enter the target telephone number, including “PAUSE” as required. The number
sequence can be up to 32 digits long.
Note:
(A pause may be stored in the memory dial sequence, but it may not be the first
digit. Flash may not be stored in a memory dial sequence.)
5) Press the “STORE” key again.
6) Press the auto dial key where the number is to be stored.
7) Press the “SPEAKERPHONE” key to disconnect. The selected line’s LED will turn
off, indicating completion of programming.
SELECTING LINE 1 AND LINE 2
The patented PrimeLine/RingLine Select™ feature of the CL2100 series makes selecting
the correct line as easy as picking up the handset or engaging the speakerphone. This
feature prioritizes the ringing or idle line. To manually select another line, press the key
(“Line 1” or “Line 2”) that corresponds to the desired line.
RECEIVING A C
ALL USING THE HANDSET
When the CL2100 series receives an incoming call, both the base and handset will emit an
audible ringing tone. The message LED and the “ON” key LED on the handset will be
flashing, following the ring cadence.
To receive the call with the handset not
on the base cradle:
1) Pick up the handset.
2) Press the “LINE” key associated with the ringing line, indicated by the blinking LED.
3) The proper “LINE” LED will illuminate.
4) To end the call, place the handset on the base cradle, or press the “LINE” on/off key.
To receive the call with the handset on the base cradle:
1) Pick up the handset.
2) The handset will automatically answer the call and the appropriate “LINE” LED will
illuminate.
3) To end the call, place the handset on the base cradle, or press the “LINE” on/off key.
RECEIVING A CALL USING THE SPEAKERPHONE
1) Press the “SPEAKERPHONE” key on the base unit. The speakerphone will answer
the call. The “SPEAKERPHONE” LED will turn on to indicate that speakerphone is
activated.
2) To end the call, press “SPEAKERPHONE” key again. The “SPEAKERPHONE”
LED will turn off.
TO PLACE A CALL USING THE HANDSET
1) Press the desired “LINE” key on the handset. The LED will illuminate.
2) Listen for dial tone, then dial the desired number.
3) To end the call, press the “LINE” key for that line. The LED will turn off.
TO
P
LACE A
CALL USING THE SPEAKERPHONE
1) Press the “SPEAKERPHONE” key. The “SPEAKERPHONE” LED will illuminate.
2) Listen for dial tone, then dial the desired number.
2 3


